Tag Archives: vegetarian

Swiss Chard

I’m writing this from the car in the corner of the parking lot at the soccer field. My kids got a weird combination of Cliff bars, macaroni and cheese, carrot sticks and apple slices for dinner tonight, depending on where they were going and what they were doing. Last night was slightly better.

I have been missing making dinner but I didn’t know how much until I got out my big sauté pan. The way it clangs as I drag it over the iron grate on the stove – I love that sound. My black apron with the orange pig embroidered on the bib has been hanging limply on its peg for weeks. I wrap the long strings twice around my waist then tie them in a bow in front. On the table is a heap of chard, rainbow stems poking out from the wide green leaves, papery garlic, a bottle of aged vinegar with a tiny cork on top, a tall slim green bottle of olive oil and a little prep bowl of dried chili.

I roll up my sleeves. Set the heat to medium high. Then peel and slice a couple of cloves of garlic. Swing an open bottle of green olive oil in a wide circle over the hot pan. A good pinch of dried chili, rough on my fingertips and stinging them a little bit. The garlic goes in then there’s the sizzle and the scent. Don’t let the pan get too hot. In about a minute the garlic slowly becomes golden, molten and then the air is charged with it. I lift a mountain of wet ribbons of rainbow chard and heap them in, up and over the edge of the pan. Turned with a wooden spoon, over and over. They settle down and soften. Pop the lid on and turn down the heat. In ten minutes with a few tosses and turns, they’re nearly done. A splash of sherry vinegar or balsamic vinegar, a little softened butter and a generous pinch of sea salt. Finished. 12 minutes worth of work.

I am not sure why making chard this way is so gratifying. It just is.

 Sautéed Swiss Chard 

  • 2 bunches Swiss Chard
  • 2 cloves garlic
  • 2 tbsp olive oil
  • pinch of red chili flakes
  • sherry or balsamic vinegar
  • softened unsalted butter
  • sea salt
  1.  Wash the chard carefully and slice into 1” ribbons. Do not dry it.
  2. Heat a 12” sauté pan over medium heat heat while you peel the 2 cloves of garlic and slice them thinly.
  3. Pour the olive oil over the pan. It should shimmer immediately.
  4. Add the chili and the garlic. Stir until the garlic is deeply golden. Don’t burn it whatever you do. Brown garlic is bitter and not in a good way.
  5. When the garlic is golden, add the chard. Toss until it settles down a little and is coated with the olive oil. Clamp a lid on top, turn down the heat and wait 5 minutes.
  6. Take a peek and toss it. Does it look dry? Add a tablespoon or two of water. Stir and clamp down the lid again. In five minutes the chard should be tender.
  7. Remove the lid and toss in the butter. Sprinkle about a tablespoon of vinegar over the top. Season with salt to taste – I think about 1/2 a teaspoon should do the trick.

I didn’t write about the kalbi skewers I picked up at the grocery store. Or the nice but bland jasmine rice on the side. There wasn’t much to say about this dinner, but after weeks of bland quick cooking before soccer practice, that little hit of hot garlic was so satisfying.

A Perfect Day for Gazpacho

I am on vacation. If you have been reading this blog for awhile, you know that I usually take the summers off. This is never intentional. Summer should be the best time of year for writing about food and as I spend a good part of the summer in California, I have tons to write about. So, today I am up at 6:00, the sun just burning through the early morning fog. Everyone is still asleep so I can sort through photos, tap away on the keyboard, sip a large bowl of cafe au lait and write in peace! Through the open window, I think I hear an owl. When I look up, the valley is barely visible through the twisted branches of the live oaks outside. It is cool up here in the front bedroom with the breeze blowing through the open windows. Nothing like how hot it will be by noon. In a couple of hours, I’ll drive down the road to the farm in San Martin so we can have gazpacho for lunch. There, the tomatoes almost burst in the heat, the cucumbers staked under their their wide green leaves are crisp and cool, and the air is spicy with garlic.

There are two ways to make gazpacho. You can hand chop the vegetables or you can puree them in a blender. Hand chopping vegetables into precise smithereens seems like a waste of time on a blisteringly hot day, when the tomatoes are perfect for gazpacho. On hot days, you shouldn’t have to work too hard just to make a little lunch. This is why you have a blender.

Gazpacho – serves 10

  • 1 cup tomato juice
  • 1 (2-inch) piece baguette or if you don’t have any on hand (I didn’t) 1 slice of any kind of sandwich bread, crusts removed
  • 15 very ripe medium tomatoes, coarsely chopped
  • 1 1/2 medium English cucumbers, peeled and roughly chopped
  • 3 cloves garlic, roughly chopped
  • 2 1/4 teaspoons kosher salt
  • 2 teaspoons Spanish smoked paprika (smoked paprika has gone so mainstream they even sell it at Trader Joe’s!)
  • 1/4 cup sherry vinegar
  • 1 cup extra-virgin olive oil
  1. In a blender, soak bread in tomato juice for 15 minutes.
  2. Blend until smooth.
  3. Add tomatoes, cucumbers, garlic, salt, and smoked paprika. Blend again until smooth.
  4. With motor running, slowly add the vinegar, then the olive oil.
  5. If you have the patience, chill for 4 hours, then serve. I had a bowl right away with an ice cube in it, and then another bowl 4 hours later.
The Garnish
  • 1/2 cucumber, finely diced
  • 1/2 red bell pepper, finely diced
  • 1/2 small red onion, finely diced
  • 1 tsp sherry vinegar
  • 1 tbsp extra-virgin olive oil
  • 1/4 tsp kosher sea salt
  • 1/8 teaspoon freshly ground black pepper
  1. In medium bowl, toss together all ingredients.
  2. Ladle gazpacho into bowls.
  3. Spoon chopped vegetable mixture into middle of each bowl, dividing evenly among bowls. Serve immediately.

Leftovers can be kept in the fridge for 2 days.

Delicious Detox Day 5 – A bit hungry

5:00 AM. Saturday morning. The sun is out for the first time in months and my bedroom is too bright. The birds are shrill. I’m pretty sure it wasn’t the sun or the birds though. I’m awake. Nobody else in my house is. I’m awake because I. Am. Starving.

I look over at Martin who is snoring softly. To my ear, incessantly. I think I might be able to go back to sleep, despite my growling stomach if only…I give him a quick kick. Just a little one. A stage whisper – You’re snoring! Roll over! He snorts and flips over muttering. I look at the clock. 5:07. Ugh. Too early to get up. I could sneak down to the living room with a book but I don’t. I’m too hungry.

After an eternity of tossing, I see that it is 5:55. Since it is so bright outside I wonder if there is any chance that this might be perceived as a reasonable time for a cup of coffee?! A latte would totally help. Ooh, and maybe a little sandwich! How early can I wake Martin? Maybe today I can wake him up pretty early. The sun is very bright and perhaps he’ll think it’s later than it really is…

I nudge him with my elbow and whisper – Hey, are you awake?! – He sighs then groans. – Wha?! Wha’s wrong?! –  I try to smile winningly at his closed eyes, hoping he’s peeking but he is totally fast asleep and me smiling isn’t helping at all.  Maybe I can hold out a little longer.

6:15 AM. I think this might be when the timer on our coffee maker starts the drip and the scent of coffee should start wafting up the stairs at any moment. The coffee could be ready in less than 5 minutes! I toss dramatically and sigh, yanking the covers in my direction. One of Martin’s eyes pops open. He stares at me blearily and then his eyes drift shut again. I think he read my mind. – The coffee doesn’t start until 6:45 on the weekends. So don’t look at me like that. – If he could roll his eyes he would, but his eyes are closed. I have to plead. – Oh please, I’m starving!– and I try smiling winningly again. No dice.

I think he can probably feel the intense beam of my gaze against his eyelids. – Sarah. My legs aren’t working yet, I can’t even move my arms. I am not ready to get up. You’ll have to make the coffee if you want it this early.

I am so desperately hungry though. Too hungry to make coffee. Too hungry to make toast. So I beg. He caves. Thank goodness!

Ten minutes later Martin returns, shaking his head, rolling his eyes, but he is carrying a tray. A steaming bowl of a latte scented with nutmeg and cinnamon, a tiny but excellent sandwich, sharp Italian cheese, bitter marmalade and butter – on this special bread Martin makes for Siri. It has spelt flour in it, and dried apricots and hazelnuts. This is such a marvelous breakfast. Especially if you have been over-zealously detoxing the previous day.

Blame my irrational behavior on extreme hunger please. There is no other explanation. And then, if you are taking the month off from any kind of crap bread, sugar, red meat and are finding yourself starving at inconvenient times, check out the following recipe. My cousin gave it to me. It is perfect for a healthy afternoon pick-me-up. I made it for a cocktail party this weekend and then immediately made another batch for me. Lima beans have a bad rap so don’t let them put you off. Lima Bean Pate is an herbaceous and lemony, gorgeously green spread for little crostini (for the kids, as almost no bread is delicious enough for Delicious Detox) or for crisp vegetable delivery devices – like celery, red and orange pepper or cucumber.  Lima Bean Pate can be ready in about 20 minutes – 15 of which is hands off.  It is the perfect afternoon snack. Very nice.

Lima Bean Pate

(adapted from The Lee Brothers Southern Cookbook)

  • 2 c. water
  • 1 tbsp kosher salt, plus more to taste
  • 2 c. frozen baby lima beans
  • 1/4 c. tightly packed fresh mint leaves (from about 6 stems), washed and dried
  • 1/4 c. tightly packed fresh flat-leaf parsley leaves (from about 6 stems), washed and dried
  • 2 tbsp  lowfat buttermilk
  • 1/4 c. olive oil
  • 1/4 c. lemon juice (from 1-2 lemons)
  • Freshly ground black pepper to taste
  1. In a small saucepan, bring the water and 2 teaspoons salt to a boil over high heat. Add the lima beans and let boil until just tender, about 12 minutes. Drain in a colander and rinse under cold running water for about 2 minutes to cool. Shake the colander several times to drain as much water from the beans as possible.
  2. Place the beans and the remaining ingredients in the bowl of a food processor and process to a smooth, thick puree, about three 30-second-long pulses. Between pulses, push any of the mixture that clings to the side of the processor toward the blade with a rubber spatula before pulsing again.
  3. Season the pate to taste with salt and pepper and transfer it from the processor to a small bowl or plastic container. Cover tightly, and store in the refrigerator until ready to use, not more than 3 days.

Delicious Detox: now I’m ready

I was serious. I mean, I am serious. I fully intend to take the entire month of May to eat intentionally and thoughtfully. Spring is actually a tough time to eat healthily because at our house we have to eat a lot of cake. Starting in February with Martin’s birthday which is quickly followed by Leo’s, then Alistair’s, with Siri’s trailing a month after, I make and eat more cake in the spring than at any other time of the year. In the midst of all that cake-eating celebration we have school auctions as well, which are festivals of even more towering desserts. So it’s not so much Spring (which was awfully cold, wet and un-spring-like this year) as cake season. The abundance of cake works well actually, as a slice of cake with a small cup of dark coffee and a splash of cream on a rainy day makes Seattle seem less soggy. If you lived here you’d agree with me. Anyway, here’s a photo of the final cake – Siri’s. Genoise with cream, custard and raspberry jam, covered in marzipan turned green with matcha tea…

Delicious doesn’t even come close. We finished that one off yesterday.

So, because of the last birthday coinciding with the beginning of May, today I’m resetting the start date of the delicious detox. This means plain yogurt and fruit for breakfast, a single egg omelette with cheese for lunch. If I must snack, an apple will have to suffice. Dinner could be almost anything and tonight it’s a big salad. Trawling through the grocery store, I found radicchio, a bulb of fennel, more asparagus. Tonight I will splash them with olive oil (just a little), sprinkle sea salt over the top, roast everything until crisp, arrange over lettuce and arugula, toss in some leftover grilled chicken. Then, I’ll strew toasted walnuts over the top and maybe a bit of goat cheese – and be done with it. The kids will get basil pesto and spaghetti to fill in the gaps. (I will not be having any of that!)

Roast Vegetable Salad with Chicken – serves 2 generously

  • 1 fennel bulb, quartered with a little core attached to each piece to hold it together
  • 12 asparagus spears, trimmed
  • 1 head radicchio, rinsed and quartered
  • 1 tsp fresh thyme leaves
  • two handfuls arugula, washed and dried
  • a small red lettuce, washed, dried, and torn into bite sized pieces
  • either a shallot, thinly sliced or a couple of scallions, thinly sliced
  • a handful of toasted walnuts
  • 1/4 cup crumbled goat cheese (Just crumble it yourself. The pre-crumbled kind is weird.)
  • leftover grilled chicken
  • olive oil
  • 2 tbsp walnut oil
  • 2 tbsp champagne vinegar
  • sea salt and black pepper

1. Set the oven to 425.

Raw fennel

2. Toss the fennel slices with a little olive oil and set them on a rimmed baking sheet. Sprinkle with sea salt and freshly ground black pepper and roast for 30 – 40 minutes until caramelized and cooked through. You may want to turn them after 20 minutes. Set aside.

Raw radicchio

3. Do not dry the radicchio thoroughly. Toss with 1 tbsp olive oil and sprinkle with sea salt, pepper and the fresh thyme leaves.  (Or, as you can see, whole sprigs if you are in a hurry.) After the fennel has been in the oven for 10 minutes add the pan with the radicchio. Turn the radicchio after 15 minutes and continue to roast until tender. The fennel and radicchio should be done at approximately the same time. Remove from the oven and set aside.

Roast radicchio and fennel

4. Set the oven to broil.

5. Toss the asparagus with olive oil and sprinkle with kosher sea salt and freshly ground black pepper. Broil for 4 minutes, turning the asparagus once half way through.

6. Whisk 2 tbsp olive oil, 2 tbsp walnut oil, and 2 tbsp champagne vinegar together until emulsified. Add a pinch of sea salt and several grindings of pepper.

7. Arrange the arugula and lettuce on a large platter. Place the radicchio, fennel, asparagus and chicken over the leaves. Toss the walnuts and goat cheese over the top. Dress.

The heat of the oven transforms the floral notes of fennel to caramel. The radicchio loses it’s bitter edge and the flavors turn round, rich and warm. I like the contrasts too. Cool creamy and tangy goat cheese. The bitter crunch of toasted walnuts. Soft green leaves. The slick of walnut oil in the dressing adds another compelling note.

I don’t know if the kids would have liked this or not as they didn’t end up getting any. Martin and I ate so quickly. We were starving.

Goat Cheese Honey Basil

Last week, Alistair had a couple of friends over after school. One of them has these little wire glasses, is rather small and is sort of nerdy. He usually wears too big camo-pants and a baggy t-shirt. Somehow he managed to disengage from the vortex of video games in the living room and make his way into the kitchen where I was kind of enjoying that all those boys were otherwise occupied. Oh well. He peered hungrily at my plate – Do you have anything to eat? What is that?! –  I should mention that I actually really like this kid. He’s very curious and he’s game for almost anything I serve. This time, molten goat cheese on toast with honey and basil. It was what I happened to have on hand.

Four o’clock on a Friday afternoon is a good time for a slightly decadent snack and this one is easy. I always have goat cheese and honey, and somehow, I even had fresh basil in a box in the fridge. You spread the cheese thickly on a slice of baguette, run it under the broiler until browned and bubbling, drip honey over the top and garnish with a basil leaf or two. That’s it. My sister-in-law made them and served them with cocktails on a dulcet summer evening on her terrace at the edge of a forest outside of Stockholm. It was late and the stars were just coming out, you could see them through the silhouette of the canopy of trees; the sun lurking just below the horizon. That was a lovely night. However, if standing around the kitchen counter on a sunny Friday afternoon, with a quirky and engaging ten year old, is where you happen to be, that will do nicely. Alistair’s friend took a bite, then his eyes kind of bugged out and he smiled. Then he said articulately – Wow. – I could tell he really liked them because he ate several. When we ran out of toast, we switched to oat crackers, which we didn’t toast for obvious reasons. It was still an excellent snack, we agreed.

This tiny ten year old and I stood at the counter together, me happy to have remembered this little bit of deliciousness and him marveling at how completely scrumptious it was. What a cool kid.

Warm Goat Cheese Toasts with Honey and Basil

  • soft mild goat cheese
  • honey
  • sliced rustic bread or sliced baguette or even an excellent whole grain cracker
  • basil leaves, washed and dried
  1. Preheat the broiler.
  2. Toast the bread lightly then spread thickly with goat cheese. Broil until bubbling  and golden.
  3. Drizzle honey over the cheese and top with a whole basil leaf or two.
Because I was sharing my hor d’oeuvres with a ten year old, I drank mineral water and let him have root beer.  If you have a bottle of cold dry white wine though, I would open it up and have a glass. It’s nearly Friday night after all.


Breakfast

What does a person, who mostly writes about dinner, eat for breakfast? One might well wonder. I guess I’m a creature of serially monogamous breakfast habits. Obviously I like variation at dinnertime, but not in the morning. Years  and years of eating the same thing for breakfast over and over again feels just right to me.

Right after college it was peanut butter and bitter marmalade on an English muffin and a cafe au lait. My roommate and I brewed these up in our Bialetti Moka Express on the funky Harvest Gold stovetop in our Russian Hill apartment. I think I ate that for breakfast for maybe ten or fifteen years.  Then there were a few years, maybe four or so, of poached eggs on toast. With a cup of Murchie’s Empress Afternoon Blend tea and a glass of orange juice. That was in the Pacific Heights apartment. After I met Martin, we ate boiled eggs with this kind of weird, pink, caviar paste. It came in a bright blue tube with a smiling, little, blond boy on the front. That phase didn’t last too long. I love Martin but that pink caviar is only ok. It doesn’t hold a candle to peanut butter and marmalade.

On trips to Sweden to see Martin’s family, I discovered all kinds of cultured milk. Kefir, filmjölk, all kinds of yogurt, quark, fresh cheeses. There began a long period of variations on yogurt for breakfast. Initially this led to making my own yogurt for awhile. Then kefir finally became available in the U.S., that was really exciting! (Yes, I do live in cave.) Lastly, Greek yogurt finally arrived, the richest, thickest, most luxurious of all. Martin started making a deeply toasted muesli with dried cherries. I got stuck on that with the Greek yogurt for a long, long time. Later, switching it up with honey, raspberries, some ground walnuts and a squirt of lemon juice, was heaven.

When winter rolls around though, raspberries become ludicrous. They fly in from South America and I think “oh – how fresh and so exotic in the wintertime”  but they’ve travelled miles to get to Seattle, and taste as if they’ve been around the block a few times. For something so mediocre, they cost the earth.  I tried the bags of frozen local berries but quickly tired of them.

Fortunately, a few weeks ago, in a little plastic box pushed out of sight behind the toaster and leftover from a wintery Sticky Toffee Pudding: I remembered – Medjool dates! (What?! You’ve never had Sticky Toffee Pudding? I will remedy that by posting the recipe at some point…) Their deep fruity caramel flavors are in perfect counterpoint to the brightly sour yogurt. Toasted walnuts left from a grapefruit salad added complex bitterness. I confess my sweet tooth doesn’t allow plain old yogurt: I needed something sweet. Dark Grade B maple syrup – we always have that in the fridge. Maple + dates  are made for each other– I will have to figure out a dessert with those two some day. The crown on this breakfast though, is the salt. A small but decisive pinch of kosher sea salt provides a glittering, edgy crunch. Perfection.

I think I will eat this until I am old and grey.

Yogurt with Dates, Toasted Walnuts, Maple Syrup and Sea Salt

  • 3/4 cup yogurt – read the ingredients list – there should be no additives, nothing to thicken it but the bacteria. My yogurt (Straus) has non-fat milk, buttermilk and the yogurt cultures. I also like the European Style Organic Plain Yogurt from Trader Joe’s
  • 2 tbsp grade B maple syrup
  • 2-3 tbsp (about 7 walnut halves) toasted for 10 minutes at 350. (I would toast at least a cup or so at a time)
  • 3 medjool dates, with pits, pitted. (Pitting is easy and I think the dates with pits taste better)
  • a pinch of Kosher sea salt (I like this one, as you may already know)

This is hardly a recipe, but here’s what I do:

  1. Take the kids to the school. Return home and take a deep breath. Take 15 minutes for breakfast.
  2. You’ll want your favorite bowl. I like a deep round one because it fits so nicely into the palm of my hand when I sit eating on the couch with the newspaper but I have a fond recollection of my mother-in-law’s wide soup plates. Soup plates work better on a table though. It’s your choice. Put the yogurt in the bowl.
  3. Drizzle 2 tbsp maple syrup over the yogurt (I have to confess I kind of love it when I “accidentally” pour in too much…shhh)
  4. With a small sharp knife, make a lengthwise slit down the dates. Push out the pit. I like the dates quartered the long way. Scatter them with the walnuts over the yogurt and maple syrup.
  5. Take that decisive ( not too much and not too little) pinch of kosher sea salt and strew it over the yogurt dates and walnuts.
  6. Get a soup spoon and sit comfortably somewhere, eating this magnificent yet simple breakfast, reading the paper, gathering your thoughts, then finally getting on with things.

Snowed In – Red Lentil Soup

Sometimes this magical thing happens in my kitchen, where I have all of the ingredients, even some that are fairly obscure, and I can make something really delicious on the spur of the moment.  I love it when that happens.

Since Plenty, what I’ve been in the mood for is vegetables, and this blog I follow, Dana Treat, has tons of ideas for seasonal delicious vegetable food. (Notice that I didn’t say vegetarian? I really am not a vegetarian.) Still, maybe because of the holiday gluttony, vegetarian, even vegan food is what I crave. So I was very happy to discover this soup last week. It’s one I’ve eyed and abandoned in the Deborah Madison Vegetarian Cooking for Everyone for years. For some reason, I think because Ms. Madison described the soup as “thin”, it didn’t sound so delicious. Then I saw the photograph on Dana Treat, and I was turned. This is a fabulous soup. Also, it is very easy to make, which proved to be very handy when I was housebound with four kids for three days last week.

So often jilted by the weatherman predicting snow, I refused to believe what the weather reports were saying. Surprise, surprise! Wednesday morning we were totally snowed in, a rare thing in Seattle. I couldn’t get the car out of the driveway. I was afraid to even try. I was kind of desperate to come up with a dinner for four hungry kids using only what I had in the cupboard. Scanning the recipe for Red Lentil Soup with Lime; was it possible I had what I needed?! I peered into my pantry.

Wow. I had two cups of red lentils! I had basmati rice! Turmeric and cumin – I always have those! When I found some only barely wilted cilantro in the crisper and a couple of limes, there were clearly beautiful possibilities for dinner. (Although I feel I must mention that my brave and kind friend Mary Alice went out into the cold to bring us a gallon of milk, orange juice and—because I’m shameless—some fresh spinach for this soup! She trekked through the snow and ice with a backpack and Yaktrax (so cool!) on her boots for us!) Technically I suppose we could have skipped the spinach, but when you’re snowed in you get anxious for something green.

As always, and even though there is rice, I think this is lovely with homemade croutons. Only five extra minutes!

Red Lentil Soup 

from Vegetarian Cooking for Everyone, by Deborah Madison

  • 2 cups split red lentils
  • 1 tbsp turmeric
  • 4 tbsp butter
  • salt
  •  1 large onion, chopped fine (about 2 cups)
  • 2 tsp ground cumin
  • 1 1/2 tsp black mustard seeds
  • 1 bunch of chopped cilantro
  • juice of three limes
  • 1 bunch of spinach sliced crosswise in ribbons
  • 1 cup cooked basmati rice
  • full fat Greek yogurt for garnish
  1. Put the lentils, turmeric, 1 tbsp of butter, and 1 tbsp sea salt with 2 1/2 quarts of water in a 7 qt. heavy sauce pan or dutch oven. Over medium high heat, bring to a boil, then lower the heat and simmer for 20 minutes. The lentils should be very soft and nearly falling apart.
  2. Using an immersion blender, pureé until very smooth.
  3. While the soup simmers, in a large heavy sauté pan, cook the onion in 2 tablespoons of butter, with the cumin and the mustard seeds, over low heat. When the onions are very soft, after about 15 minutes, add the cilantro and cook for one more minute.
  4. Add the onion mixture to the soup and the juice of two limes. Taste to see if you would like more lime juice. This soup tastes very good a little sour.
  5. When it is time to serve the soup, take 1 tbsp of butter and melt in a wide skillet over medium heat. When it foams add the spinach and sprinkle with pinch of seasalt. Cook until it is just wilted and divide among the soup bowls. (I skipped the spinach for my son, he hates it. The soup was still very good)
  6. Add a generous spoonful of warm rice to each bowl. Ladle soup over the spinach and rice.
  7. Garnish with a dollop of yogurt.

Croutons

While the soup is simmering and the onions are sweating in butter, you could make the croutons. They are not required but I totally love them with this soup. I happened to have a very stale ciabatta on the counter during the snow week and I hacked off slices all week long. I put croutons under poached eggs, with cheese and salami and with this soup. It really doesn’t matter if the bread is very stale. The croutons should be glossy with butter and olive oil and so crisp they shatter as you bite down.

I would cook the croutons first, and then wilt the spinach, in the same pan.

  • 4-6 slices from a loaf of stale artisan bread, about 1/3″ thick
  • 1 tbsp butter
  • 1 tbsp olive oil
  1. Heat the butter and oil over medium high heat.
  2. Sauté sliced bread until golden, then flip. 1-2 minutes per side.

There is something about this soup, or maybe there are a few things. First of all, the color is ravishing, a pure saturated yellow, flecked with bright green cilantro. The scent of melting onions and the toasted aroma of mustard seeds were the perfect antidote to a cold wintery night. And then of course there was the cool, creamy, yogurt, in counterpoint to the richly flavored soup. We all loved it.

Snowed in

Winter Couscous + Winter Cocktail

I have a new cookbook.

Actually I’ve had it for a few months now, but with Christmas and everything, I forgot about it for awhile. Until the past few weeks, I never tried a single recipe. That didn’t prevent me from having a very good feeling about it. (Or from giving it as a Christmas present several times.) It’s called Plenty.

Anyway. I’ve been playing around with it a lot. Usually, if I get five recipes  from a single cookbook, I feel like I’ve done really well. With Plenty, I’m going to challenge myself to cook every recipe. The writing and the photographs are so inspiring! On Monday I tried the Winter Couscous and I’ll definitely be making that again – maybe even tomorrow.

It’s sort of funny – how much I like this book because I have no instinct become a vegetarian, and this is a book all about vegetables. I simply couldn’t give up meat as I love to cook with it and I would miss the flavor too much if I stopped eating it altogether. However, after reading Plenty, I could actually see how I might make an entirely plant (ok, plant plus butter and cheese!) based diet work. As soon as I started flipping through this book without a speck of speck, a shred of pork, a breast of quail, a leg of duck, I wanted to try everything. I’m not even going to skip the eggplant section. And I nearly always think eggplant is creepy.

Another thing. This Ottolenghi – he’s not so chef-y in his cooking. Complicated techniques are not what you’ll find in his book. This is food with a wild riff-y flamboyance, full of vim and a middle eastern accent, but no craziness. It sort of reminds me of this roommate of mine from college, Craig, who used to cook for us on weekends. Many late Friday nights found him in our shared kitchen, heaps of ingredients on the cutting board, a glass of wine by the stove, music playing. More and more people would show up and he’d just add a little of this or that to the sauté pan. When we finally sat down to eat, it was often unpredictable and always delicious. We loved those evenings, the fun of Craig’s happy confidence in the kitchen. There’s something about the loose and playful style of cooking in Plenty, fearlessly combining flavors of far reaching origins, that reminds me of Craig cooking. Ottolenghi’s recipes are those of a gleeful, passionate chef, devoted to color and flavor. In Plenty, I found my favorite ingredients in dazzling and unexpected combinations. I’m just wild for this book.

I made the Winter Couscous on Monday night after we got back from skiing. You might think, judging from the longish list of ingredients, that this was an odd choice, after a rough drive down the mountain through a blizzard. The recipe did require a perhaps too extensive run to the grocery store when we were all wiped out. (Thanks Martin! It was worth it though…right?!)  But the vivid colors! The aroma! The deliciousness! I totally think it was worth it. If I were you, I’d make it on a relaxed Sunday the first time. You’ll see how simple it is and make it again right away.

Winter Couscous

from Plenty, by Yotam Ottolenghi

  • 2 carrots – peeled and cut into 3/4″ dice
  • 2 parsnips – peeled and cut into 3/4″ dice
  • 8 shallots – peeled
  • 2 cinnamon sticks
  • 4 star anise
  • 3 bay leaves
  • 5 tbsp olive oil
  • salt
  • 1/2 tsp ground ginger
  • 1/4 tsp ground turmeric
  • 1/4 tsp hot papricka
  • 1/4 tsp chilli flakes
  • 10 ounces butternut squash – peeled and cut into 3/4″ dice
  • 1/2 cup dried apricots – roughly chopped
  • 1 can chickpeas, drained
  • 1 1/2 cups water
  • 1 cup couscous
  • a large pinch of saffron
  • 1 cup boiling vegetable stock (I used Better Than Bouillon. I don’t think this is the occasion for making stock from scratch, unless of course you have some hanging around.)
  • 3 tbsp butter
  • 2 tbsp harissa (You could buy some, or you could make it yourself! I wrote about it here. It’s worth the effort.)
  • 1 preserved lemon, inner flesh removed and discarded, peel finely chopped
  • 2 cups destemmed whole cilantro leaves, washed
  1. Preheat the oven to 375.
  2. In a large roasting pan, put the carrots, parsnips, shallots, cinnamon sticks, star anise, bay leaves, 4 tbsp olive oil, 3/4 tsp salt, ginger, turmeric, paprika, and chile flakes. Toss well.
  3. Place in the oven and roast for 15 minutes.
  4. Add the squash and toss. Return to the oven for 35 minutes.
  5. Add the apricots, chickpeas and 1 1/2 cups of water. Cook for 10 more minutes.
  6. In a large Pyrex or other heatproof bowl, combine the couscous with 1 tbsp olive oil, the saffron, and 1/2 tsp salt. Pour the boiling stock over the couscous, stir, and cover the bowl with plastic wrap. Leave for 10 minutes.
  7. Add the 1 tbsp butter to the couscous and fluff until the butter is melted and incorporated. Cover with the plastic wrap again and leave near the stove to keep warm.
  8. To finish, mound the couscous on a large platter. Stir the harissa and preserved lemon into the vegetables. (Or, if you have sensitive children, serve the spicy harissa in a pretty bowl with a little spoon at the table, to be mixed in to taste.) Taste the vegetable mixture for salt and adjust if necessary. Spoon the vegetables and any juices onto the couscous. Strew cilantro leaves over the top and carry this gorgeous, fragrant mess right out to the table. Leave the whole spices in – they are so beautiful on the platter.
While you’re cooking, get somebody to make you one of these:
Ginger Cocktail
from the Art of the Bar by Jeff Hollinger and Rob Schwartz (by far the best book of cocktails I’ve seen)
  • 8-12 mint leaves
  • 1/2 ounce ginger syrup (see recipe below – you’ll need to make this in advance)
  • 1 1/2 ounces gin
  • 1/2 ounce fresh lime juice
  • ginger ale
  1. Put the mint leaves in a tall glass, pour in the syrup and muddle until you can really smell the mint.
  2. Fill up the glass with ice and pour in the gin and lime juice. 
  3. Top up with ginger ale.
  4. Gently stir to combine.
  5. Garnish with a slice of lime.
Ginger Syrup
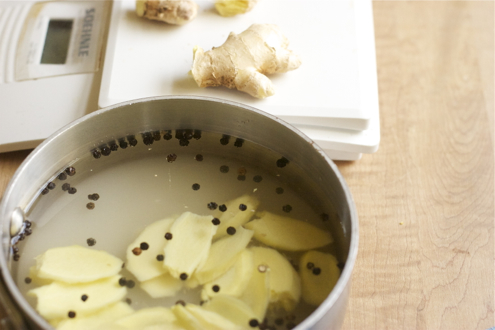
2 ounces fresh ginger, peeled and thinly sliced
1 1/2 tsp black peppercorns
1 1/2 cups of water
1 cup sugar
Combine the ingredients in a small heavy saucepan and simmer for 30-40 minutes. Cool completely. Strain. Keeps for two weeks in the refrigerator.


The (failed) Salad Redux

The holidays are over. It is raining listlessly. Through the window in my office I can see the looming black shape of the evergreen in the yard, the grey stick mass of the leafless maple tree and the leaden cocoon of the winter sky. In the living room, the Christmas tree is strung with a series of dusty, white, spider webs connecting the Santa Claus at the top to the light on the ceiling. Tree limbs droop with the weight of the ornaments and there are more and more needles on the carpet. (I’m taking the tree down tomorrow, I swear!) Outside, it is not particularly cold and certainly not warm, but it is soggy. Thick new moss grows on everything, greenly blanketing paths and the steps – even tree branches. What an excellent time of year to play around in the kitchen!

It was about this time last year that I wrote about grapefruit in salad. The winter weather must drive me to anything at all reminiscent of sunlight. Anyway, I made this salad over the holidays again and again and sent the recipe around to anyone who asked for it. (It’s a reworked and vastly improved version of the failed salad) I must have eaten it twenty times in the last month and I’m still not sick of it!

The candied walnuts were very last minute. There were none left at the grocery store (probably because I started a run on them!) so I had to find a recipe. I made the walnuts for the first time this Christmas Eve. Crisp, spicy and so one-more-handful-ish, I made a batch minutes before leaving for my aunt’s house: a sweet little extra Christmas gift. How perfectly handy –  to have a recipe like that.

The Salad

for 4-6 people

  • 2 bunches of watercress
  • a wedge of blue Castello or Cambozola, cold – to make cutting easier
  • a handful of candied walnuts (see recipe below)
  • 2 pink grapefruits or 3-4 blood oranges
  • 1 tbsp currants
  • 1 shallot – thinly sliced into rings
  • 2 tbsp Champagne vinegar
  • 1 tsp red wine vinegar
  • 6 tbsp olive oil
  • salt and pepper
  1. Combine 1 tbsp hot water and red vinegar in a very small bowl with 1 tbsp currants.
  2. In another very small bowl, toss champagne vinegar with the sliced shallot.
  3. Wash and dry the leaves of watercress and mound on a large platter.
  4. Cut the Blue Castello into small pieces, removing any rind, and strew over leaves.
  5. With a very sharp knife cut the top and bottom off the grapefruit. Cut off all the rind and pith. Over a medium sized bowl, carefully slice between the membranes to remove the fruit in sections, catching any juice and the fruit in the bowl.
  6. Arrange the sectioned grapefruit over the salad.
  7. Toss the walnuts over the top.
  8. Lift the shallots out of the vinegar carefully, reserving the vinegar for the dressing. Pulling the rings apart, scatter the shallots over the salad.
  9. Drain the currants, and toss over the salad.
  10. Add 1-2 tbsp grapefruit juice to the  small bowl with the champagne vinegar. Whisk in olive oil, 1/2 tsp sea salt, and a few grindings black pepper.  Dress the salad – you may not need all the dressing.
Candied Walnuts
(can be quadrupled!)
  • 1 cup large walnut pieces (mostly halves)
  • 2 tbsp maple syrup
  • 1 tbsp sugar
  • 1/2 tsp kosher sea salt
  • several grindings of pepper
  • an optional pinch of cayenne (I liked it; my kids, not so much)
  1. Preheat the oven to 325.
  2. Toss all ingredients together in a medium sized bowl.
  3. Lightly spray a rimmed cookie sheet with vegetable oil.
  4. Spread the coated nuts over the cookie sheet.
  5. Toast for 15 minutes, stirring every 5 minutes.
  6. Remove from oven and cool stirring every few minutes so they don’t stick too badly to the pan.
You might think you’re mad at me when you see how the maple syrup and sugar seem welded to the cookie sheet. Don’t worry. Pour a cup or two of very hot or boiling water over it and in a few minutes it will wash right off.

Ribollita

More cannellini beans. More soup with bread stirred into it. What can I say? I imagine it will be difficult to convince anyone that they ought to run out and try this soup. I was dubious too, the first time I tried it.

I don’t think it’s just the memory of the candlelit barrel vaulted brick ceiling in the restaurant or of being an architecture student in Florence or of walking out in the chilly darkened narrow streets of late fall behind the basilica of Santo Spirito. That memory is sketchy and faded and would be unlikely to have any bearing on how I remember this soup. It was over 20 years ago after all. I do remember the cistern quality of the room, the dim light, the heavy dark wooden furniture. Also that it was kind of thrilling to enter a space that was so deep underground. A dozen of us crowded around a long corner table. We’d been strongly encouraged to try the ribollita. Yes, skip tagliatelle al cinghiale e porcini. Skip bistecca alla fiorentina. (It’s way out of your meager student budget anyway.) Don’t just order a salad or pasta. So I, like everyone else at the table except for one extremely picky person, shrugged and ordered ribollita. I am still so happy I did.

Ribollita is not a brothy soup. It looks like wet stuffing. (I shouldn’t have written that. Now you’ll never try it.) There are ragged shreds of cavolo nero run all through it – it wouldn’t be ribollita without the cavolo nero. Don’t think you can just substitute plain old kale or cabbage and still call it ribollita. Bread is essential. I have come across recipes that layer the bread in the soup like some kind of bread lasagna. This seems wrong to me. It needs tearing up and stirring in; transforming plain old minestrone into a deliciously rich velvet mess. A drip or two of green olive oil over the top, just before serving – that’s also important.

Ribollita is the easiest thing in the world to make and at the same time, time consuming. To extract rich flavor from such simple ingredients, you have to let it cook for awhile but the hands on part is minimal. You will be richly rewarded for a little planning and labor! I think I might be begging you to try this…No, I am begging you to try this. You won’t regret it. Ribollita is just the thing for December. Utterly warming and deeply satisfying on an almost spiritual level for adults. And yet my four year old plowed through a large bowl. Even after burning his tongue, he kept on eating. Then he asked for seconds.

Ribollita – serves 6

  • 1 cup of cannellini beans, soaked over night and simmered for about 45 minutes until tender. Save the cooking liquid. (Simmer with a bay leaf and a couple of smashed cloves of garlic. Add a tablespoon of salt towards the end.)
  • A small bunch of chopped parsley, finely chopped
  • 2 cloves of garlic, peeled and chopped
  • 4 large stalks of celery, chopped
  • 2 medium carrots, peeled and chopped
  • 2 red onions, peeled and finely chopped
  • 4 tablespoons olive oil
  • 1 (14 1/2 ) ounce can whole plum tomatoes, drained and chopped
  • 1 bunch cavolo nero, stalks removed and sliced into coarse shreds
  • 1 loaf of stale pugliese or other Italian style bread, crusts removed and torn into 1-2″ pieces
  • sea salt and freshly ground black pepper
  • extra virgin olive oil and parmesan
  1. Over medium heat, in a large heavy soup pot, place the parsley, garlic, celery, carrot, onion and olive oil and stir. When the vegetables are hot and gently sizzling, turn the heat down to low and cover. Leave for about 30 minutes, stirring occasionally. Do not let it stick or brown.
  2. Add the tomatoes, and cook for another 30 minutes in the same way.
  3. Add the cavolo nero and half the cannellini beans with enough of their cooking liquid to cover everything and make the soup liquid. Simmer for another 30 minutes.
  4. Using an immersion blender if you have one or a food processor if you don’t, puree the remaining cannellini beans. Add them to the soup. If the soup looks dry, add a little boiling water until it is just liquid.
  5. Add the bread, several glugs of extra virgin olive oil, and season to taste with sea salt and pepper.
  6. The soup should be extremely thick.
  7. Garnish each serving with more olive oil at the table and parmesan if desired.