Tag Archives: easy

Mission Figs and Blue Castello

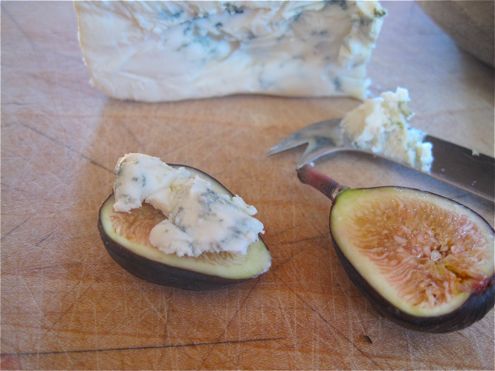
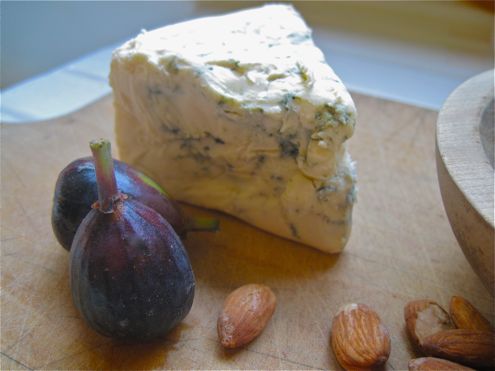
When we go on vacation, I’m always sure I’ll post at least something short at Notes on Dinner, but it never really works out that way. I took pictures on the trip though and now I have something very easy for August: figs and blue cheese for an appetizer, although it might also be dessert. Oozing creamy cheese shot with threads of sharp blue underscores the sweetness of black figs, sticky with juice. An old wooden board, a knife, a little glass of crisp mineral-y wine. It might seem off the cuff, even haphazard, but it’s not. This is laid back yet composed; some might even say elegant. (That might be me!)

I won’t call this a recipe and it seems silly to write it all out but here’s how it works:

  1. Buy a basket of Black Mission figs and a wedge of Blue Castello or a similarly rich mild blue.
  2. Rinse figs.
  3. Unwrap cheese.
  4. Get knife.
  5. Serve on a cutting board. I like to let people cut the figs and cheese themselves.

That’s it. The only little nicety you might add, if you get to the market in the morning, is to pull the cheese from the icebox an hour before you eat. You could also put a few almonds or walnuts out – they’d be even prettier served in the shell with a nut cracker.  We had a glass of chilly rosé with our figs, blue and almonds and that was just right.

More fun with beets

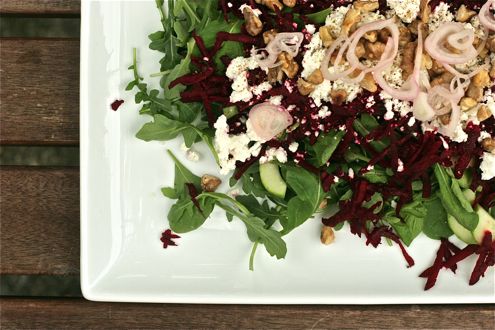
As if they weren’t already wonderful enough roasted and tossed into a salad! Those little beets you get in the summertime, red or chioggia, don’t need any cooking at all. All you have to do is peel them and grate them on a box grater. 2 small beets for 1 big salad – I use arugula or little gem for greens, cucumber, shallots, goat cheese, toasted walnuts. You can see how I made the first beet salad here. Just substitute grated raw beets for the cooked. Now that’s fast.

Summer with a twist – Rhubarb cocktails and gravad lax

It’s summer (sort of) here in the Pacific Northwest.  I’m going to keep this quick and offer Gravad Lax – home cured salmon – as an option for when you are tired of the grill.

For me this happens maybe once each summer – usually during a heat wave when it’s too hot to stand around flipping burgers in front of a red-hot pile of charcoal. Instead of singeing your eyebrows off in 90 degree heat by the Weber while your guests are sitting over there drinking cold beer, your dinner is already done, so you can be sitting in the sun with a beer too. You see, you salt the fish two days before you eat it, allowing it to cure in the refrigerator. About half an hour before you want to eat, pull the salmon from the cold of the fridge and shave the thinnest translucent slices possible from the fish. The salt will have pulled all the moisture out and the color will be vividly red. The cool salty-silky salmon is a welcome change from peppery charred filets you might expect on a hot June night. Even though it’s not exactly hot here in Seattle.

I like to imagine serving gravad lax in the long bright evenings you get in Stockholm at midsummer, but without the mosquitoes. We didn’t have mosquitoes last week but since this is Seattle in June, we had rain, rain, rain. No sultry summer evening in the garden for us! Still, we had a fantastic time with friends. With the salmon, we served rhubarb cocktails. I’m including both recipes. Happy summer!

The Stockholm – serves 1

  • 1/2 ounce aquavit
  • 1/2 ounce cointreau
  • 1 1/2 ounces rhubarb puree (recipe follows)
  • dash of orange bitters
  • Prosecco to top up
  • a piece of orange peel, cut wide with a sharp vegetable peeler

Rhubarb puree – makes enough for many cocktails

  • 4 stalks rhubarb, rinsed and sliced into 1/2″ slices
  • 3-4 tbsp sugar
  • juice of one lime

  1. Preheat the oven to 400.
  2. Toss all ingredients together in a small baking dish (for instance, an 8″x8″ square pan or a gratin). Cover tightly with aluminum foil.
  3. Bake in the oven for about 1/2 an hour until the fruit is completely soft.
  4. Push the rhubarb through a fine mesh sieve with a wooden spoon or, if you are feeling completely lazy, puree in the food processor. (if you opt for the food processor, the puree will be somewhat fibrous)
  5. Refrigerate until cold and proceed.

Assembling the cocktail:

  1. In a tall cold champagne flute stir together the aquavit, cointreau, rhubarb puree and the bitters.
  2. Top up with chilly Prosecco and float a wide piece of orange peel to finish.

This is now my favorite summer cocktail. That St. Germaine that I sometimes rave about would potentially be an excellent substitute for the Cointreau if you happen to have any lying around.

Gravad Lax – serves 6-8 as a generous appetizer

Allow 4 days to complete the recipe. Note that there is a total of 15 minutes  easy work though.

  • 2 pounds salmon (I used Copper River sockeye)
  • 2 teaspoons peppercorns (I used mixed), lightly crushed
  • 4 tablespoons kosher salt (not fancy kosher sea salt & not sea salt, just regular old kosher)
  • 2-4 tablespoons sugar (I used 3)
  • About a cup of rinsed, coarsely chopped dill
  • lemon wedges, finely minced onion, chopped chives, crème fraiche, cucumber slices, coarse sea salt, thinly sliced dark rye bread to serve

  1. Day 1-2: Freeze the salmon for 48 hours to kill any parasites.
  2. Day 3: First, cut the salmon fillet in half across the short dimension. If you pull any pin bones with needle nosed pliers, you will make slicing and serving a lot easier.
  3. Stir the peppercorns, salt and sugar together in a small bowl.
  4. In a rimmed baking dish (to catch any salt that doesn’t adhere) rub about a third of the salt mixture on the flesh side of each piece of salmon.
  5. Sandwich the salted fish, flesh sides together, with the rest of the salt mixture and the dill in the middle. The thick part of one piece should top the thin part of the other. Place in a gallon-sized Ziploc bag, carefully sealed, in the bottom of the refrigerator for 2 days. I would put the bag in a baking dish. Turn the bag a couple of times a day.
  6. Day 5: After 2 days, drain any liquid and scrape off the salt mixture and dill and place in the freezer for half an hour (you don’t HAVE to put it in the freezer but it sure makes slicing it very thin a lot easier)
  7. Gravad lax keeps for at least a week, drained of all the accumulated liquid, in the refrigerator. Well wrapped, it keeps for 3 months in the freezer.
  8. Serve with crème fraiche, chopped chives or minced red onion, lemon wedges, maybe a few cucumber slices and if you are feeling ambitious (I recommend this) some excellent homemade rye bread with fennel seeds. (If you haven’t tried rye without caraway seeds, you haven’t lived. You won’t be disappointed I promise – send me a comment if you want the recipe!) Otherwise some of those rye cocktail squares or German style pumpernickel would be fine.

I like to make a big platter with everything, piling up the gravad lax and all the condiments in heaps. Little teaspoons can scoop up the crème fraiche and onions. Everyone can build little sandwiches according to their own taste. A little bite of sandwich, a taste of the cocktail, and around it goes. What a nice party! A more organized person than I am would at least provide cocktail napkins. Oh well.

Harissa: Just try this, please


It was an unassuming dark little blob, nudged onto the corner of an oval platter of creamy hummus, almost hidden beneath a tangle of long cooked greens (chard maybe?!) and a scattering of currants. It’s not like I’m unfamiliar with harissa. I’ve had it on a couple of other occasions. Swirled into creme fraiche, harissa came with a heap of blisteringly hot matchstick french fries at one of my favorite restaurants in Portland. So, I was inspired to buy a jar as I tried to copy another restaurant dish for my birthday party last fall. The prepared harissa, though, was a disappointment and it kind of wrecked the whole meal for me. The little jar with the bright yellow Moroccan pattern on the label looked promising but tasted one note: hot-sweet and tomato-y. No sultry bitter complex fire, which is what I wanted. What I remembered from the Portland restaurant. That little jar has been languishing in my fridge long forgotten, and I bet I’ll toss it next time I see it.

So last week, when my friends ordered the chickpea puree at Sitka & Spruce, I was non-plussed when I saw the harissa, a wall flower hanging out on the edge of the plate, not even seeming to merit mention on the menu. I’ll pay no attention to that, I thought. I’d forgotten how enamored I’d been initially. The puree was fantastic though – I think there was a smattering of walnut or walnut oil, but toasty not bitter like the bitterness you find in tahini. So I ventured toward the harissa, which was darker, less tomato-y looking than the one I bought.

I tore off a piece of the rustic, slighty sour bread and dabbed it into the blond puree, then dipped the tip of my knife into the dark daub. Scent preceded taste: smoke! Then a bite. Oh, so that’s what it should taste like! Here was deft bitterness and deep smoldering heat. A muted lemon note. A complex counterpoint to the creamy foil of the chickpeas. So now I’m infatuated; this is a tiny bit inconvenient because harissa doesn’t seem to be the most kid-friendly condiment.

But therein lies the beauty!  Hummus=healthy, kid friendly albeit slightly bland snack food. Hummus+harissa=sophisticated, sultry fare perfect for grown-ups. Potato chips=blandly attractive and kid-friendly. Harissa+creme fraiche+potato chips=spellbindingly cool, adult nibble, perfect with cocktails. Do you see where this is heading?! I hope I am not overstating the allure of harissa. (I am often guilty of overselling.)

The first batch I made was too small. First of all, the four adults at dinner ate the whole batch in one go; second of all, it was so small my food processor couldn’t whirl it around effectively. I ended up chopping it finely with my chef’s knife and that was fine but if you’re in a hurry, definitely double the recipe. You’ll certainly eat the whole batch before the week is out. Now that I know how easy it is to make harissa, I’ll never buy it again.

And now I can revisit that so nearly wonderful birthday dish and share it with you next time. It was on the very verge of incredible and with this harissa, I know it will be perfect.

Rosemary skewered lamb with Israeli couscous, preserved lemon, hazelnuts and harissa

Harissa

  • 12 dried chile de àrbol
  • 3 cloves garlic
  • 1/2 tsp salt
  • 2 tbsp olive oil
  • 1 tsp ground coriander
  • 1 tsp ground caraway
  • 1/2 tsp cumin
  1. Soak the chilies in hot water for 30 minutes.
  2. Drain and cut in half lengthwise. With the tip of a sharp knife, scrape away the seeds and discard.
  3. In the food processor, whirl the chilies, garlic, salt and oil. Purée until smooth. Add the coriander, caraway and cumin and continue to process until smooth.
  4. This will keep for a month in the refrigerator in an airtight container with a slick of olive oil over the top. But I seriously doubt it will last that long!

My late spring salad: Beet, Chèvre, Arugula & Pine Nuts

So this is it. This is the salad that I wait all spring to make. It’s the chioggia beets you really can’t find in the winter here in Seattle. They’re still only available in the farmer’s markets – the weather has been so cold. This salad’s not fancy. Really, the vibe is more kitchen sink than thoughtfully composed. The varied textures: earthy and sweetly roasted chioggia beets, greenly cooling cucumbers, the sliced shallots pinked up in vinegar, providing a gently persistent bite – that’s what grabs me. Not to mention peppery arugula plus peppered spicy chèvre. Dotted with warmly toasted pine-nuts – I adore this salad. In fact, although it serves four, I would happily eat the whole thing, on it’s own, and call it dinner. (to give you an idea of just how greedy I am, this recipe lushly fills a 15 inch platter)

Beet, Chèvre, Arugula, Pine Nut Salad – serves 4

  • 4 small chioggia beets
  • 4 handfuls arugula, washed and dried
  • 1 medium sized shallot, sliced thin
  • 2 ounces fresh chèvre – with mixed peppercorns
  • half a peeled and seeded English cucumber, sliced
  • 2 tbsp champagne vinegar
  • 4-6 tbsp extra virgin olive oil
  • 3 tbsp pine nuts, toasted in a skillet over medium heat for a few minutes
  • extra virgin olive oil
  • sea salt and freshly ground black pepper
  1. Preheat the oven to 400
  2. Trim the beets, cutting off both tails and leafy tops. Wrap them in aluminum foil and place them in a small baking dish. Roast in the oven for 1 1/2 – 2 hours. If you are appalled at putting such a small dish in the oven at such a high temperature for 2 hours, you could always roast a chicken to go with it – that would be lovely. (of course if you don’t actually feel like roasting a chicken and all you really want is the darn beet salad and actually not 2 whole hours from now but in, like, 1/2 an hour I suppose you could always steam them in a little vegetable steamer. 20-40 minutes of steaming depending on how big the beets are. It won’t be quite as good but it will still be pretty great.)
  3. While the beets are cooking, put the shallot slices into a small bowl with the champagne vinegar. Manipulate the slices with your fingers to separate the rings and to make sure that they become saturated with vinegar.
  4. When the beets are done, you’ll be able to push a fork into them. Don’t wait until they’re mushy and don’t take them out when they’re still crunchy. If you cook them early in the day they can sit on the counter until you are ready to peel them, slice them and put them in the salad. A cooked beet should NEVER see the inside of the fridge. They become horribly watery and mushy.
  5. Add 4 tbsp olive oil to the bowl with vinegar and shallots. Whisk with a fork and taste – it should be nicely balanced without aggressive acidity. Add 1/4 tsp sea salt and taste again. You may like up to 2 more tbsp of olive oil. Add freshly ground black pepper to taste.
  6. Peel the beets and slice them into 1/8ths.
  7. On a large platter, arrange a bed of arugula. Scatter the cucumbers and beets over the greens. Then crumble the chèvre over everything. Toss the pine nuts evenly over the top and finally dress lightly, you may not have to use all the dressing. Be sure to fish out all the shallots and include them – they add so much flavor and delicate color!
  8. Quickly get out your camera and take a picture before you eat the whole thing! I forgot to take a picture until it was nearly gone last time, as you can see:

So of course I had to make it again the next day!

(Sometimes I make a variation of this salad that includes roast asparagus – which may seem over-the-top and disorganized but I have to confess that I love it. Smoky toasted asparagus and smoky roasted beets – lovely. You can see I included tomatoes here – probably wouldn’t do that again. They weren’t offensive but they added nothing.)


le Grand Aioli


The reductive pleasure of this very simple meal is hard to convey. Plain poached cod surrounded by plain blanched haricots verts, asparagus, English peas and little beets. I would have liked baby carrots but we had a bag of the large workhorse variety so I cut them up and didn’t give it a second thought. Baby turnips and long French radishes would also have been elegant, modern and springlike but I came from 2 hours of standing in the fiercely cold rain for kid soccer and when I got to the market I just wanted to get out and get home. Fancy vegetables can wait for next time. (Believe me, there will be a next time) The glory of le Grand Aioli is of course the aioli, with its velvety opulent burn. Seriously, it takes less than 2 minutes to make.  After demolishing the plate of fish and vegetables, which we plunged into the aioli, we went through half a loaf of toasted Colombia bread that had been slicked with a very green olive oil, spreading silky aioli over it thickly too. After that, I nabbed all the crusts of this excellent bread from the plates of my children (what a drag it will be when the kids figure out this is actually the best part) and wiped the little aioli bowl clean. It was that kind of dinner.

Of course, in my mind le Grand Aioli is meant to be enjoyed on a sunny terrace, cracked granite underfoot with a glass of very cold very crisp mineral-y white wine and white threadbare very soft linen napkins somewhere in the south of France or in a garden in England under a trellis of lilacs on an unseasonably warm late spring afternoon. We ate at our dining room table with a perfectly lovely Malbec my dad brought over and 3 children who initially complained bitterly about the meal and then suddenly ate everything in sight. And the sun came out too. I credit the aioli.

Le Grand Aioli – serves 4

You will have to make a court bouillon but most likely you have all the ingredients stored anyway. It’s very quick. Start with the court bouillon and everything else will fall into place.

Court Bouillon

  • 2 pints water
  • 2 carrots
  • 1 large onion
  • 1 stick of celery
  • 2 cloves
  • 7 peppercorns
  • 2 bay leaves
  • 1 tbsp sea salt
  • 2 tbsp white wine vinegar

In a large non-reactive saute pan with a lid (unless you are one of those people who owns a fish poacher in which case now is the time to haul it out), combine all of the ingredients and bring to a simmer over high heat. Reduce heat to medium low and simmer for 20 minutes. Now it is ready to use.

Aioli

  • 1 egg
  • 1 tsp Dijon mustard
  • 1 clove garlic smashed in a mortar and pestle with 1/2 tsp sea salt
  • 1 tbsp white wine vinegar
  • freshly ground pepper
  • 1 cup vegetable oil (or 3/4 cup vegetable oil, 1/4 olive oil – I find all olive oil to be too strong)

Place all ingredients in the tall narrow cylindrical container that comes with an immersion blender and blend for a few seconds until the oil is emulsified and the aioli is thick.

If you have no immersion blender, this can also be done in a food processor or blender, in which case you must leave out the oil and very slowly in a very thin stream add it to the rest of the ingredients as the blades are spinning.

The Vegetables

  • 4 ounces haricots verts
  • 1/2 pound asparagus, rinsed and trimmed
  • 1 pound English peas in their pods, remove their pods
  • 4 little beets
  • Baby carrots, peeled and greens trimmed short — or big carrots, peeled and cut to the size of a baby carrot.

The Fish

1 1/2 lbs skinned cod fillet

Consider also baby turnips, radishes, small potatoes (fingerling), baby artichokes, spring onions. Next time I make this, it’s going to be crazy and even more beautiful. You can also include quartered boiled eggs and garnish with parsley. I was too cold and too tired to do this.

Fill a 4 quart saucepan with water, cover and bring to a rolling boil. Add 2 tbsp sea salt and start blanching vegetables in batches. If you plan to steam the beets, set up a steamer alongside.

Scrub the beets and trim their tails and tops. The beets take longer especially if you prefer to roast them as I do: 1 1/2 – 2 hours in a 400F oven, wrapped in foil, but they can also be steamed and then peeled. I would steam them for 15-20 minutes if they are small.

The haricots verts, asparagus and English peas will take 2-4 minutes in the boiling water. Carrots take 2-5  minutes depending on their diameter. Start checking everything after 2 minutes. Blanch everything separately so you can carefully control when it is perfectly done. The vegetables should be crisp tender. A device called a spider is useful here, for fishing everything out quickly at the right time.

After boiling these tender green vegetables, it is nice to dump them in a bowl of ice water to stop the cooking. I have no ice maker so I pull them a little early and lay them in one layer on a rimmed sheet pan on a dish towel.

As the vegetables are cooking (they’ll be served room temperature), bring the court bouillon to a simmer and lay the cod in it. It will not cover the fish. Put a lid on the pan and simmer for 5 minutes. Turn off the heat and allow the cod to sit in the broth until you’ve finished the vegetables. About 15 minutes.

Carefully remove the fish to a large white platter that can accommodate it with all the vegetables. Serve with toasted crusty bread that has been slicked with olive oil and the aioli. A little dish of coarse sea salt would be lovely for sprinkling over everything.


After School Snack: Cardamom Scented Mango Lassi

Even though I love to cook, I never cook with my kids. Why? It’s too messy for one thing. For another, the older kids have gotten minor cuts while chopping and that makes me nervous. Frankly, the kitchen is an excellent place to temporarily check out from parenting – I like the focused solitary activity. Besides, the work I do there is still in service of my family. If I’m acting escapist in hiding out and chopping, so what? When I’m done, we’ll have an excellent dinner. I don’t want to manage developing knife skills, cross-counter trails of sugar, or little hands sticky with raw eggs. (How awful it is to confess to that!) Moms are SO not supposed to admit to these kinds of feelings. Sigh. I’m not going to worry about it though. There are other things to do.

After I read Madhur Jaffrey’s autobiography Climbing the Mango Trees, I thought: I want that kind of childhood for my kids, those kinds of food memories, the tumult of food culture that shaped her life. I imagine her in long braids and a bright dress, banging through the kitchen door after school, welcomed by a round terra cotta bowl of creamy basmati rice pudding scented with cardamom and garnished with shattered toasted pistachios. Or waking to a winter breakfast of daulat ki chaat, whose ingredients include fresh whole milk, seafoam and dew. (Dew!?!) Ms. Jaffrey describes this “heavenly froth” as “the most ephemeral of fairy dishes”.

Ok, ok. I know I can’t collect dew on the roof of my house and come up with some magically memorable breakfast. I can’t even get raw milk very easily. (Anyway, think of the bacteria!) And sea-foam? Forget it. I’m imagining the looks on their little faces if I told them that no, we aren’t having waffles and bacon for breakfast, instead, how about milk with sea-foam and dew!?! I want them to be able to roll with it, but maybe not that much.

Still, I think there are things I can do if I want to give my kids incredible food memories. Imagine getting off the school bus in Seattle, rain running off the shoulders of your parka, and stepping into a warm kitchen. There on the counter, a clear pitcher of golden creamy mango lassi, drops of condensation glistening on the sides.  Serve it cold. Listen for the delicate slurp as you pour it into a glass. Pay attention and catch that earthy lemon scent of cardamom. Isn’t it lucky Ataulfo mangoes are everywhere in late spring?! This has to be a step in the right direction.

Ataulfo Mangoes

Mango Lassi

  • 1 cup mango, cut from 1 ataulfo mango
  • 1 cup yogurt
  • 1/2 cup ice water
  • 4 green cardamom pods
  • 2 tbsp sugar

This couldn’t be any easier.

  1. Put all the ingredients in your blender and whizz for 2 minutes.
  2. Push the lassi through a sieve with a spatula or wooden spoon to remove the pulverized cardamom.
  3. Pour into a glass and drink.

The hard part could be figuring out how to get all the flesh off the mango. A friend from New Zealand taught me. Here’s how:

Get started by slicing the sides off the mango

Cut a grid into the flesh of the mango

Tidy little cubes of mango

Next, peel the core and slice against the pit to remove all the mango flesh

Like I said, I don’t usually bring the kids into the kitchen when I’m working. For lassis I can make an exception.


Spring green: Roast Asparagus Salad

I have been having an incredibly good time in my kitchen this week, inspired by the first sunny and (slightly) warm weather we have had here in Seattle since…September? Seattle is blooming and everything that has been brown and wet for so long is now green. (And wet. Sigh.) Still, the green is a huge improvement. Now I want to make green food.

First there was the riff on a dish of black rice, clams, aioli and cilantro that I had at Sitka and Spruce – except I made it with sear-roasted halibut. The cilantro made it a little bit green. I loved seeing it bright and fresh in the photo. The flavor with the lemon was pure sunshine. Here’s what it looked like:

My friend Christine thoughtfully brought over an Alsatian Riesling to drink with it and it was perfect, more so because I got to share it with a really good friend. As soon as I have a chance to make the halibut again, I’ll  take pictures and post the method. I want to show you how to make aioli.

Still, I wanted the food to be greener. So I made up this very very green salad – toying with a dressing from Deborah Madison, spring asparagus, arugula, goat cheese and toasted pine nuts. Here it is:

So, there’s the bitter asparagus and the even bitterer arugula. But the asparagus’ pungency is tempered by it’s bout with the broiler. The flavor becomes rounded, richer, a little nutty. The goat cheese was something leftover from the dinner party, the sort with colored peppercorns. Martin toasted the pinenuts – for warmth and crunch. Then there’s the dressing, borrowed from Deborah Madison’s Vegetarian Cooking for Everyone. I skipped a couple of things – the big one being the capers. Here’s what Nora Ephron says about capers:

Any dish that tastes good with capers in it tastes even better with capers not in it.

I agree 100% and I feel validated in my opinion because Nora Ephron said it first.

Anyway, the dressing. I made it for this cabbage and arugula slaw that I was sure would be wonderful (it wasn’t) but the dressing had potential. (without the capers!) Garlic, salt, fennel seed and black peppercorns are mashed together with a mortar and pestle and then left to macerate with olive oil, shallots and lemon rind. It’s complex. Fire from the garlic and peppercorns, high spring notes of fennel and lemon and the edge-y richness of sliced shallots and champagne vinegar. Without the capers, it’s pretty fantastic. This is an extremely green, salad tour de force. I think after this cold and gloomy winter what I needed was a giant hit of chlorophyll.

With the salad, we made the grilled shrimp with bread crumbs from Marcella Hazan’s Essentials of Italian Cooking that I wrote about last summer and the white bean and basil puree that I wrote about when I first started writing Notes on Dinner.  And here is how to make the green salad:

Asparagus Salad with Arugula, Goat Cheese and Pine Nuts – serves 4

  • 1 bunch of asparagus, rinsed, ends snapped off
  • 2 tbsp olive oil
  • sea salt and pepper
  • 4 generous handfuls of arugula, washed and dried
  • 1 ounce goat cheese – with peppercorns, if you like that sort of thing, crumbled
  • 2 tbsp pine nuts, toasted in a small dry skillet over medium heat until glossy and golden

The Dressing (for this you will need a mortar and pestle)

  • 1 clove garlic
  • 1/4 tsp sea salt
  • 1/4 tsp fennel seeds
  • 1/4 tsp peppercorns
  • 1/2 tsp dry tarragon
  • 1/4 cup parsley, minced and divided
  • 1 shallot, thinly sliced
  • 1 zest of a lemon – finely grated with a microplane
  • 1/3 cup olive oil

Preheat the broiler – set it to high.

In the mortar and pestle, mash the garlic, sea salt, fennel seeds, peppercorns, tarragon and 2 tbsp of the minced parsley until you have a smooth paste.

Stir in the lemon zest, shallots, the rest of the parsley and olive oil and leave to macerate for 1/2 an hour.

While the salad dressing is resting, arrange the arugula on a large platter.

Then toss the asparagus with 2 tbsp olive, 1/2 tsp sea salt and several grindings of black pepper on a rimmed sheet pan. It should be in one layer. Broil 4 inches from the heat until bubbling; toasted but still crisp/tender. My asparagus was just under 1/2″ in diameter and this took about 2 minutes per side – a total of 4 minutes.

Remove the asparagus from the pan and arrange while still hot, over the arugula.

Strew the crumbled goat cheese and pine nuts over everything.

Add the champagne vinegar to the dressing and taste. Does it need more salt?

Ladle the dressing over the salad – depending on how much asparagus and arugula you have, you may not need all of it.

So I have this photo of the dinner and I’m not crazy about it. I don’t like to make excuses when I think something is lame; as my aunt says: you have to feign nonchalance in these situations. But this is sort of funny. My boys were so desperate to get their hands on this dinner (they both love Ms. Hazan’s juicy and crisp shrimp) that when I wanted to stop for less than sixty seconds to take the picture, they both started to cry! So I stopped messing about and served dinner. Everyone was happy. Here’s the photo:
It could have been a lot prettier but seriously, it was totally delicious.


Codcakes – really?!

Really. And believe me, I was skeptical. My friend Liz made them first from a recipe collection she got from me! Codcakes. It’s sounds like the sort of tame and ridiculous expletive my mother sometimes uses – “Fishhooks! Codcakes!” I would never say that and if you’d asked me a week ago, I might have said I would never make codcakes either. I imagined something leaden. I worried they’d be fishy – not in a good way. Codcakes sound like the kind of thing an old person would make to use up leftovers. But Liz liked them. In fact I believe what she said was “Sarah, you have to try them. They’re totally excellent!” She was right and I was completely wrong.

I wouldn’t admit this to a true crab cake connoisseur because it would  probably lead to a long and boring argument, but for a fast last minute weeknight meal that won’t threaten your retirement savings, these are pretty close to crabcakes. Really very delicious. Crisply browned on the outside in olive oil, tender within and greenly perfumed with basil. The garlic gives them a little attitude. If you don’t agree that they are wonderful after trying them, I’d love to know why.

Codcakes with Basil Aioli

This recipe can be doubled very easily. The five of us demolish a double recipe every time.

  • 1/2 c. mayonnaise
  • 2 tbsp lemon juice
  • 1 clove garlic, pressed or minced
  • 1/4 cup fresh basil, chopped
  • Sea salt, pepper
  • 1 pound cod fillets, skin removed
  • 1 1/2 c. panko, divided in half
  • 1 egg
  • 2 scallions, minced
  • 1/4 c. olive oil

First make the sauce.

In a food processor or blender, process mayonnaise, lemon juice, garlic and basil until pale green and smooth.

Scrape the aioli into a small serving bowl and, without bothering to clean out the bowl of the food processor, pulse half the cod into a combination of finely minced and chunky pieces. Transfer fish to a large mixing bowl and process the remainder of the cod.

Using a large sturdy spatula, mix all the processed cod in the mixing bowl with 3 tbsp of aioli, 3/4 c. panko, 1/2 tsp sea salt, 1/2 tsp pepper, the egg and the scallions. It should look like this:

Form the mixture into patties – these could be quite small – 2″ is good for small children. 3″ would be fine for adults. Put the remaining panko on a plate or wide bowl, and press  all over the patties.

Heat the olive oil in a non-stick pan over medium-high heat. Don’t start cooking until the oil is shimmering. This is important and the difference between stodgy-greasy and golden-crisp. Sometimes I put the pan on the heat and walk away for a few minutes to chop a clove of garlic or change whatever music I happen to be listening to. Acquiring the patience for the pan to get hot enough took me a long time. Let the pan sit on the heat for at least 3 minutes.

Add the patties to the pan and cook about 4 minutes per side, until golden. Serve with aioli or if you have a child who is acting very silly (I did) with ketchup. The aioli also goes very well with steamed or roasted asparagus. You may want to add a little extra of everything to the sauce – you’ll want more.

How to heat up a cold spring: Smoky Spicy Chipotle Pinto Beans

Our grill has been hibernating in the garage since November. Last night we had to drag it out. 51 degrees has been the high temperature for the last couple of weeks in Seattle. Drastic measures are required. I won’t be held back by this ridiculous bleak weather. Cooking is an escape for me and cold weather might be the easiest thing to magically dispell if I can just summon the right meal. I knew just where I wanted to be. What I wanted to eat.

Twenty years ago, I moved from New York to San Francisco with Andrea, my college roommate. We had this little apartment in Russian Hill and on weekends we would escape (as if you would need to escape San Francisco!!) to my family’s old ranch house, about an hour and a half south of the city. Most weekends went something like this: On Friday after work, we hopped into her little silver Nissan Sentra with the air vent decals, with shorts and bathing suits stuffed into weekend bags and stashed in the trunk. A bottle of wine and a couple of six packs in a cooler and we took off down 101. Several cars full of friends followed from around the city. Often we met up at this Mexican roadhouse, the Sinaloa, on the old highway just outside of town. Crowded into a big booth under dreamy plaster murals of stars over golden hills we downed margaritas and gorged on gooey enchiladas. Afterwards driving slowly up to the house under a star studded black sky, we wound our way through gold grassy hills now dark. As we crunched over the drive, bats skimmed over the pool. Crickets sang loudly with a croaking toad. The air felt as warm as our skin. We unlocked a quiet house, dropping our bags and everything else.

There is nothing like a lazy morning with a group of like minded friends. The drip and sputter of a big pot of coffee. French toast suddenly sizzling in browning butter – that must have been Lee – I can just see him standing, barefoot and serious, in front of the white enamel stove in his shorts, flipping cinnamon-crisp golden slices. Half moons of pale orange melon and red berries appeared on an enameled platter – I think I can thank Andrea for that. I loved sitting in my bathing suit and a big old white terrycloth bathrobe with Amy on the diving board in the fresh morning air, sopping up maple syrup and toast, toes skimming the chilly water of the swimming pool, the sun warming my shoulders. We spent the whole day by the pool, grazing on salsa and tortilla chips, cherries chilled in ice water and drinking cold beer. Flipping through “Hello” and “OK” until we dripped sweat, then throwing ourselves into the perfect chill of the unheated pool. A couple of somersaults, a botched swandive, swimming down to touch the drain. Then lying down on the hot concrete to slowly dry off.

When the setting sun backlit the live oaks that crowned the hill, the hard edge of the heat began to soften. We were practically liquid from the sun and sleep of the day and it was time to wake up and cook. The best swim was the one in the soft early evening. That pool is so cold. First we lit up the grill. While waiting for the coals, Mark measured Triple Sec, lime juice and tequila into the big pink plastic pitcher. Thick coarse salt round the rim of my glass and I swam in lazy laughing circles around the deep end, trying hard not to spill. Andrea and her boyfriend sat at the edge of the pool, swinging their legs in the water. Amy and Lee lay toe to toe at either end of the diving board. Later when the coals were ashy and nearly crumbling, we grilled flank steak and ate it with spicy pinto beans on warm corn tortillas. Guacamole, bright with cilantro, limes, and garlic, we scooped from an old brown glazed terracotta bowl alongside.

I made steak, beans and guacamole for dinner last night. And margaritas. Is it really possible to conjure that hot lazy day from a simple dinner I made years ago!? I think so.  This was the best pot of pinto beans I’ve ever made, smoky and spicy. The stealthy, rich burn of chipotle is just the thing on a too cold spring night. Just as we sat down for dinner, the sun actually came out and shone brightly over the dinner table. It was magic, I swear.

Smoky Spicy Chipotle Pinto Beans

This menu is just a variation of the Mexican Fiesta menu I wrote up last year. The steak grilling method and guacamole recipes can be found here.

  • 2 cups pinto beans, soaked overnight
  • 1 chipotle chile in adobo sauce, chopped with a sharp knife to a pulp
  • 3 tbsp canola oil
  • 1 large red onion, finely chopped
  • 3 cloves of garlic finely chopped
  • 2 tsp cumin – if you can get it together, toast and grind the whole seeds yourself – you’ll thank me
  • 1 1/2 tbsp New Mexico chile powder
  • 1  1/2 tbsp flour
  • sea salt
  1. Put the drained beans with 8 cups of cold water into a heavy pot – that can hold about 6 quarts. Turn the heat to high and when the water boils, let it go for about 10 minutes, skimming off any scum.
  2. Add the chipotle and lower the heat to a simmer.
  3. Heat the canola oil in a medium saute pan over medium heat. Add the onion, garlic and cumin and saute for 5 minutes, stirring so it doesn’t catch. It should be browned not burnt and bitter.
  4. Turn the heat to low and add the flour and the chile powder and cook for a few more minutes, keep scraping at the bottom of the pan. Don’t let it stick and burn.
  5. Scoop up 1 1/2 cups of water from the bean pot and pour it into the saute pan, stirring. When the sauce has thickened,  scrape the whole thing back into the beans.
  6. After the beans have been cooking about half an hour add 1 1/2 tsp of salt. Continue to cook  until the beans are tender, about a half hour more.