Tag Archives: cheese

Is THIS delicious enough?

I’ve cleaned up my act. Asparagus, arugula, beets, lima beans, salmon, plain yogurt, walnuts, blueberries, raspberries and cantaloupe and a dearth of processed grains have shaped my daily menu. Instead of veering wildly from starving myself to voracious bingeing on pear and custard pastries or salt and pepper potato chips I’ve made sure to consume responsibly in a measured and thoughtful fashion. (Although I have to confess, I was occasionally saved from some very poor choices by a square of dark chocolate.)

Then over the weekend I read this article by Mark Bittman. And I watched his little video and became obsessed. As you know, I am a slave to a rustic soup and this one was full of pork fat, cheese and olive oil. I know it’s not possible to detox on all that animal protein and fat, but is it possible to eat this kind of food in the midst of a detox and still be committed to detoxing?! For me, the metric has to be based on how delicious and flavorful the food is – which is a very personal way to measure! It seemed crazy to even try this soup, but…I just had to! Even the most thoughtfully prepared detox food can quickly become very boring!

In Mr. de Carlo’s “Bone Soup” there is a side of baby back pork ribs (it could have been any piece of meat with a large bone but the pork neck the butcher had was frozen in a solid lump and I wasn’t willing to wait for it to thaw). There is a lot of olive oil, not only in the soup, but on the soup and also gilding the deftly salted croutons which garnish the soup with bright raggedly torn leaves of basil. And how about the two big handfuls of parmesan cheese, in the soup – adding body and complex, savory, tang – and then even more thrown over the soup for good measure? This is what Mr. Bittman has to say about it:

But it’s worth pointing out, I think, that the soup is neither a fat-bomb (I wouldn’t be surprised if it has fewer calories than Olga’s) nor one that lacks complexity.

I am still trying to figure out how this soup is not a “fat-bomb”…

Olga’s method, as described by Mr. Bittman, is strikingly similar to this recipe I love from Alice Waters, which if you can refrain from adding cheese, is actually vegan. It’s very very healthy. And Mark Bittman says that this might have fewer calories than a vegetable soup made with water and olive oil…Hmmm.

I can’t wrap my head around it. Oh well. I will just trust Mark Bittman!

I felt compelled to make this soup as soon as I read the recipe and I would hate not to try something so clearly marvelous because of some silly detox “rules”. This is how to think about it: Bone Soup is a little vacation from the Detox. And like a really good vacation it will be revivifying, meditative, transporting and totally necessary. It is an entirely different sort of health transgression from pastry and potato chips.  The thing is, you can eat pretty much whatever you want on a diet if you set seriously high standards – this means only eat food that is truly delicious. Since Bone Soup takes five hours from start to finish there is no danger of eating that way everyday. I wouldn’t want to. Who would?! It’s too rich. It’s a maybe once a week vacation from the berries, melons, lettuces, yogurt and fish that I usually eat.

Save this complex and warming soup for a cold day. Like yesterday.

Bone and Black Chickpea Soup

slightly adapted from Frank de Carlo’s Black Chickpea Soup

  • 1 cup black dried chickpeas, soaked over night and then drained (next time I’m going with the yellow chickpeas, black chickpeas are good but much more firm than the yellow)
  • 3 tbsp olive oil + more for the croutons
  • 1 pound baby back pork ribs
  • 1 red onion, diced
  • 1 carrot diced
  • 2 stalks celery
  • 1 14 ounce can peeled plum tomatoes, drained if very liquid and chopped
  • a bay leaf
  • a few sprigs of thyme
  • 1/2 cup white wine
  • 1 pound rustic bread cut or torn in 1 1/2″ chunks
  • 1 cup chard leaves, washed and roughly shredded
  • 2 eggs
  • coarsely grated parmesan – about 3 cups
  • fresh basil leaves, washed, dried and torn into large pieces
  1. Over a medium flame, heat 3 tbsp olive oil in a 7 quart heavy stock pot or Dutch oven.  While the oil is heating, lightly season the meat with sea salt and freshly ground black pepper. When the oil is shimmering, start browning the meat. There should be a distinct sizzle but no smoke. If you happen to burn the fond (the delicious brown crispy stuff on the bottom of the pot, be sure to wipe it off before you continue to the next step or your soup will taste acrid.) The meat should be deeply browned on both sides but not burnt.
  2. After the meat is brown, add the tomatoes, bay, thyme sprigs, drained chickpeas, wine and enough water to cover everything by an inch. Cover the pot and bring the soup to a simmer over medium high heat. Then turn the heat to low, with the lid half way off. You can simmer for 3 – 5 hours.
  3. While the soup is simmering, take a moment to make the croutons. Heat the oven to 325. Toss the bread cubes in a bowl with some olive oil, 3 or 4 tablespoons and a pinch of sea salt. Bake on a rimmed baking sheet for about 10 minutes or until they are golden and crisp. Remove and set aside until ready to serve.
  4. When both the meat and the beans are fully cooked and tender, remove the meat to a cutting board and when it has cooled slightly, shred the meat and discard the bones, fat and gristle. Add the shredded meat back to the pot.
  5. Beat the two eggs together in a small bowl and then whisk into the soup. Whisk in 2 cups of the parmesan, and swirl in a little more olive oil
  6. To serve, ladle the soup into a wide soup plate or bowl. Garnish each with a few large croutons, another drizzle of olive oil, a sprinkling of parmesan cheese and several torn basil leaves.
Mr. de Carlo describes this soup as Umbrian. I don’t understand how this works exactly, but when I eat something like this, so complex and so distinctly of a certain place, it’s like being right there in Umbria just for those few moments you are eating. And for me that is reason enough to make this soup.


Delicious Detox: now I’m ready

I was serious. I mean, I am serious. I fully intend to take the entire month of May to eat intentionally and thoughtfully. Spring is actually a tough time to eat healthily because at our house we have to eat a lot of cake. Starting in February with Martin’s birthday which is quickly followed by Leo’s, then Alistair’s, with Siri’s trailing a month after, I make and eat more cake in the spring than at any other time of the year. In the midst of all that cake-eating celebration we have school auctions as well, which are festivals of even more towering desserts. So it’s not so much Spring (which was awfully cold, wet and un-spring-like this year) as cake season. The abundance of cake works well actually, as a slice of cake with a small cup of dark coffee and a splash of cream on a rainy day makes Seattle seem less soggy. If you lived here you’d agree with me. Anyway, here’s a photo of the final cake – Siri’s. Genoise with cream, custard and raspberry jam, covered in marzipan turned green with matcha tea…

Delicious doesn’t even come close. We finished that one off yesterday.

So, because of the last birthday coinciding with the beginning of May, today I’m resetting the start date of the delicious detox. This means plain yogurt and fruit for breakfast, a single egg omelette with cheese for lunch. If I must snack, an apple will have to suffice. Dinner could be almost anything and tonight it’s a big salad. Trawling through the grocery store, I found radicchio, a bulb of fennel, more asparagus. Tonight I will splash them with olive oil (just a little), sprinkle sea salt over the top, roast everything until crisp, arrange over lettuce and arugula, toss in some leftover grilled chicken. Then, I’ll strew toasted walnuts over the top and maybe a bit of goat cheese – and be done with it. The kids will get basil pesto and spaghetti to fill in the gaps. (I will not be having any of that!)

Roast Vegetable Salad with Chicken – serves 2 generously

  • 1 fennel bulb, quartered with a little core attached to each piece to hold it together
  • 12 asparagus spears, trimmed
  • 1 head radicchio, rinsed and quartered
  • 1 tsp fresh thyme leaves
  • two handfuls arugula, washed and dried
  • a small red lettuce, washed, dried, and torn into bite sized pieces
  • either a shallot, thinly sliced or a couple of scallions, thinly sliced
  • a handful of toasted walnuts
  • 1/4 cup crumbled goat cheese (Just crumble it yourself. The pre-crumbled kind is weird.)
  • leftover grilled chicken
  • olive oil
  • 2 tbsp walnut oil
  • 2 tbsp champagne vinegar
  • sea salt and black pepper

1. Set the oven to 425.

Raw fennel

2. Toss the fennel slices with a little olive oil and set them on a rimmed baking sheet. Sprinkle with sea salt and freshly ground black pepper and roast for 30 – 40 minutes until caramelized and cooked through. You may want to turn them after 20 minutes. Set aside.

Raw radicchio

3. Do not dry the radicchio thoroughly. Toss with 1 tbsp olive oil and sprinkle with sea salt, pepper and the fresh thyme leaves.  (Or, as you can see, whole sprigs if you are in a hurry.) After the fennel has been in the oven for 10 minutes add the pan with the radicchio. Turn the radicchio after 15 minutes and continue to roast until tender. The fennel and radicchio should be done at approximately the same time. Remove from the oven and set aside.

Roast radicchio and fennel

4. Set the oven to broil.

5. Toss the asparagus with olive oil and sprinkle with kosher sea salt and freshly ground black pepper. Broil for 4 minutes, turning the asparagus once half way through.

6. Whisk 2 tbsp olive oil, 2 tbsp walnut oil, and 2 tbsp champagne vinegar together until emulsified. Add a pinch of sea salt and several grindings of pepper.

7. Arrange the arugula and lettuce on a large platter. Place the radicchio, fennel, asparagus and chicken over the leaves. Toss the walnuts and goat cheese over the top. Dress.

The heat of the oven transforms the floral notes of fennel to caramel. The radicchio loses it’s bitter edge and the flavors turn round, rich and warm. I like the contrasts too. Cool creamy and tangy goat cheese. The bitter crunch of toasted walnuts. Soft green leaves. The slick of walnut oil in the dressing adds another compelling note.

I don’t know if the kids would have liked this or not as they didn’t end up getting any. Martin and I ate so quickly. We were starving.

East Coast Spring: Ramp & Ricotta Tart

 Alistair looked at the tart with a raised eyebrow. That’s not the only thing we’re having for dinner, is it? 

Actually we are also having grilled asparagus — and without missing a beat I passed the platter of charred green spears to him to take to the table. We both sighed deeply, an inner groan, dreading dinner in different ways.

He plunked himself down in his chair and looked intently at his brother. Leo, check out the weird green stuff mom is making us eat for dinner. I rolled my eyes and served them each a slice. The tart cut beautifully, the ramps just tender enough to yield to my knife. It looked gorgeous too, with that messy nonchalance that seems to be the thing in food photography. It also smelled pretty good. The whole house smelled great in fact, probably because of the bacon. And also, probably because of the bacon, both boys tried the tart. Those boys. First the ramp tart was deemed too green, and all of a sudden they’d cleaned their plates and were asking for seconds. This kind of moment is very gratifying for parents.

We got a big bag of ramps from the chef at Martin’s office. (Chefs seem to be de rigueur in larger tech offices – I know this must seem inconceivable to most working people. Don’t worry, it seems that way to me too.) We also got cauliflower rabe, leeks, and rhubarb.

Ramps are not something you see on the West coast very often although I’ve heard they’re trying to cultivate them here in Washington. They’re a kind of wild leek. They grow in the forest on the east coast like crazy at this time of year. Locals actually give them away because they’re so abundant; elsewhere they show up in posh restaurants up and down the coast. On the east coast these are a locavore, foraged delicacy; until recently in Washington, they were an exotic import. I was pretty excited to try to make them into something. It took me two days to think of exactly what I wanted to do…

I have to say, in a mere two days, those ramps kind of took over. I had read, and failed to heed, the warning that ramps need to be carefully wrapped in the refrigerator because of their aggressively leek-y smell. It’s more than that. There is an underlying funkiness that is hard to describe, intriguing but not entirely pleasant. I carried on with the tart anyway, dying to know what all the fuss was about.

The tart was actually kind of wonderful. Was it because of the ramps though?! Certainly they added a sort of earthy exoticism. On the other hand, doesn’t anything taste good with ricotta, shallots and nutmeg? Ramps are very lovely to look at and it is fun to try new and unfamiliar foods. Do I think you should make this tart if you can’t get your hands on any ramps? Absolutely. Use scallions (making very sure that they’re spanking fresh ones)  if you can’t get ramps. You’ll still have an unusually pretty tart, reeking of spring (and bacon!)

Ramp Tart

  • 1 3/4 cups ricotta
  • 1 egg
  • 5 slices of good bacon
  • 1 large shallot, sliced
  • 3 cups fresh spinach leaves, rinsed
  • a grating of fresh nutmeg
  • 15 ramps
  • sea salt and pepper
  • 1 partially-baked tart crust – Use this tart pastry recipe replacing half the all purpose flour with whole wheat flour. Allow the pastry to rest for an hour in the refrigerator before rolling it out and baking. See below for instructions.
  1. Preheat the oven to 375.
  2. In a large non-stick skillet, cook the bacon over medium heat until somewhat but not totally crisp. Set aside on paper towels. Pour out all but 1 tbsp of the drippings.
  3. In the leftover bacon fat, sauté the sliced shallot until softened. Place in the bowl of the food processor.
  4. Wipe out the skillet with a paper towel and add the wet spinach leaves. Set over medium heat until wilted. Add to the bowl of the food processor.
  5. Put the ramps in the skillet with a little water – maybe a 1/3 cup. Cook the ramps until they are a bit wilted. Drain and set aside.
  6. Add the ricotta, egg and a grating of nutmeg, a pinch of salt and several grindings of pepper to the food processor. Whirl until completely mixed and smooth.
  7. Cut or tear the bacon into bite sized pieces.
  8. Fill the the tart shell with the ricotta mixture. Scatter the bacon over top and arrange the ramps over the bacon.
  9. Bake in the oven for 35 minutes or until puffed and golden at the edges.

Baking the Tart Pastry

I was kind of nervous about the pastry in the loose bottomed tart pan. Lining a regular pie plate is pretty easy but the ridged edge of the tart pan seems like it would be more difficult. I was wrong. See below. If I can do it, anyone can.

Using a rolling pin, lift the circle of dough over the tart pan

Gently press the dough up against the edges of the tart pan

Push the rolling pin over the edges of the pan to remove the excess crust neatly

With a sharp fork, poke holes all over the crust

Line the crust with parchment and fill with dried beans. Bake at 400 for 9 minutes until the pastry no longer looks raw. Then remove the beans and return to the oven for 3 more minutes.

I was going to write about the Delicious Detox too, but it can wait until tomorrow. There was a very Delicious Setback on Day 1…

Goat Cheese Honey Basil

Last week, Alistair had a couple of friends over after school. One of them has these little wire glasses, is rather small and is sort of nerdy. He usually wears too big camo-pants and a baggy t-shirt. Somehow he managed to disengage from the vortex of video games in the living room and make his way into the kitchen where I was kind of enjoying that all those boys were otherwise occupied. Oh well. He peered hungrily at my plate – Do you have anything to eat? What is that?! –  I should mention that I actually really like this kid. He’s very curious and he’s game for almost anything I serve. This time, molten goat cheese on toast with honey and basil. It was what I happened to have on hand.

Four o’clock on a Friday afternoon is a good time for a slightly decadent snack and this one is easy. I always have goat cheese and honey, and somehow, I even had fresh basil in a box in the fridge. You spread the cheese thickly on a slice of baguette, run it under the broiler until browned and bubbling, drip honey over the top and garnish with a basil leaf or two. That’s it. My sister-in-law made them and served them with cocktails on a dulcet summer evening on her terrace at the edge of a forest outside of Stockholm. It was late and the stars were just coming out, you could see them through the silhouette of the canopy of trees; the sun lurking just below the horizon. That was a lovely night. However, if standing around the kitchen counter on a sunny Friday afternoon, with a quirky and engaging ten year old, is where you happen to be, that will do nicely. Alistair’s friend took a bite, then his eyes kind of bugged out and he smiled. Then he said articulately – Wow. – I could tell he really liked them because he ate several. When we ran out of toast, we switched to oat crackers, which we didn’t toast for obvious reasons. It was still an excellent snack, we agreed.

This tiny ten year old and I stood at the counter together, me happy to have remembered this little bit of deliciousness and him marveling at how completely scrumptious it was. What a cool kid.

Warm Goat Cheese Toasts with Honey and Basil

  • soft mild goat cheese
  • honey
  • sliced rustic bread or sliced baguette or even an excellent whole grain cracker
  • basil leaves, washed and dried
  1. Preheat the broiler.
  2. Toast the bread lightly then spread thickly with goat cheese. Broil until bubbling  and golden.
  3. Drizzle honey over the cheese and top with a whole basil leaf or two.
Because I was sharing my hor d’oeuvres with a ten year old, I drank mineral water and let him have root beer.  If you have a bottle of cold dry white wine though, I would open it up and have a glass. It’s nearly Friday night after all.


Rather Exciting Tomato Soup and Grilled Cheese Sandwiches

There is something unbearably grim about March. There are some signs of spring, sure. In the back of the garden, vibrant, yellow, witch hazel blooms and the bobbing maroon, green, and white petals of hellebore sway crazily in the wind. A few weeks later, near the trellis, little purple crocuses poke up bravely. I say that because they’re getting beaten down by hail, driving rain, and then blanketed with wet snow. It’s a good thing they’re so short or they’d be flattened.

On top of all this bad weather, I’m sick of bad weather cooking. Long simmering stews?! Again?! Not another soup. Or a roast. Really, no more haunches of animals, thanks. On Saturday, we were very busy so I didn’t have time for a big cooking marathon anyway. Even though I am partial to a Saturday cooking project, they’re hard to fit in with family life. So. What I am supposed to make for dinner?

I’ll tell you. Tomato soup and grilled cheese sandwiches. But with a twist. I didn’t grow up with Campbell’s Tomato Soup or grilled American cheese sandwiches so I am not at all invested in that gestalt. What I am offering here is hardly the garden-variety tomato soup and sandwich of your youth. No. This is creamy tomato soup as you probably remember, but made smoky with bacon and hot Spanish paprika. The cheese sandwich oozes taleggio over satiny folds of Italian prosciutto and roasted salt and peppery asparagus. If you can get your hands on some buffalo taleggio, you better go for it. I have to say, not only is this menu completely delicious, but, the colors are ravishing and the perfect antidote to dreary grey skies.

Saturday night soup and sandwich: it could be really boring but I promise you, it’s not.

Smoky Tomato Soup – for 4

I suppose it takes about an hour, a lazy hour, to put this together. And if you have a picky child, you could substitute Monterey Jack for the taleggio and skip the ham and asparagus. Please though, no American cheese.

  • 1 tbsp olive oil
  • 3 slices of bacon, cut into thin matchsticks
  • 1 large yellow onion, diced, not too finely
  • kosher sea salt
  • 1 tbsp flour
  • 1 tsp thyme
  • 1/2 tsp hot pimentón (smoked paprika)
  • 1 28-ounce can San Marzano tomatoes
  • 2 cups low salt chicken broth
  • 2 tbsp heavy cream
  • freshly ground black pepper
  1. In a large heavy saucepan or smaller dutch oven, heat the olive oil and bacon over medium high heat. When the bacon is just crisp, remove it with a slotted spoon  and set aside on paper towels.
  2. Add the onion and 1/2 tsp of kosher salt to the bacon fat and cook for about 5 minutes. The onion should soften and brown slightly.
  3. Add the flour, thyme, and pimentón, and cook, stirring for 1 minute.
  4. Add the tomatoes and chicken broth. Bring to a boil, then reduce to a simmer. Cook with the lid slightly ajar and stirring occasionally for 15-20 minutes.
  5. Puree with an immersion blender or in batches in a regular blender.
  6. Stir in the cream and return to the boil. Season with salt and pepper to taste.
  7. Garnish with the bacon and as I often say, with home-made croutons. So worth the small amount of extra work!

Fancy Grilled Cheese Sandwich – for 4

  • 8 slices rustic bread – I use Columbia Bread from the Essential Bakery – the pre-sliced loaf
  • 3/4 pound taleggio cheese
  • 4 slices of Italian prosciutto
  • 12 spears of asparagus – trimmed, tossed with 1 tbsp olive oil, dusted with kosher salt and pepper and broiled for 3 minutes turning once, until blistering and crisp tender.
  • olive oil and a pastry brush or spray olive oil
  1. Cut the taleggio into 16 thin slices and lay 2 on each slice of bread. This may not cover each slice of bread completely.
  2. Lay a slice of prosciutto over 4 slices of bread and 3 asparagus spears over the top. I think it looks pretty if the asparagus tops stick out beyond the edge of the bread.
  3. Place the slices of bread with just cheese on top of the asparagus. Brush or spray the sandwiches with olive oil and grill in a hot pan, or even better, a panini press until the bread is crisp-tender and the cheese is molten and oozing.


The (failed) Salad Redux

The holidays are over. It is raining listlessly. Through the window in my office I can see the looming black shape of the evergreen in the yard, the grey stick mass of the leafless maple tree and the leaden cocoon of the winter sky. In the living room, the Christmas tree is strung with a series of dusty, white, spider webs connecting the Santa Claus at the top to the light on the ceiling. Tree limbs droop with the weight of the ornaments and there are more and more needles on the carpet. (I’m taking the tree down tomorrow, I swear!) Outside, it is not particularly cold and certainly not warm, but it is soggy. Thick new moss grows on everything, greenly blanketing paths and the steps – even tree branches. What an excellent time of year to play around in the kitchen!

It was about this time last year that I wrote about grapefruit in salad. The winter weather must drive me to anything at all reminiscent of sunlight. Anyway, I made this salad over the holidays again and again and sent the recipe around to anyone who asked for it. (It’s a reworked and vastly improved version of the failed salad) I must have eaten it twenty times in the last month and I’m still not sick of it!

The candied walnuts were very last minute. There were none left at the grocery store (probably because I started a run on them!) so I had to find a recipe. I made the walnuts for the first time this Christmas Eve. Crisp, spicy and so one-more-handful-ish, I made a batch minutes before leaving for my aunt’s house: a sweet little extra Christmas gift. How perfectly handy –  to have a recipe like that.

The Salad

for 4-6 people

  • 2 bunches of watercress
  • a wedge of blue Castello or Cambozola, cold – to make cutting easier
  • a handful of candied walnuts (see recipe below)
  • 2 pink grapefruits or 3-4 blood oranges
  • 1 tbsp currants
  • 1 shallot – thinly sliced into rings
  • 2 tbsp Champagne vinegar
  • 1 tsp red wine vinegar
  • 6 tbsp olive oil
  • salt and pepper
  1. Combine 1 tbsp hot water and red vinegar in a very small bowl with 1 tbsp currants.
  2. In another very small bowl, toss champagne vinegar with the sliced shallot.
  3. Wash and dry the leaves of watercress and mound on a large platter.
  4. Cut the Blue Castello into small pieces, removing any rind, and strew over leaves.
  5. With a very sharp knife cut the top and bottom off the grapefruit. Cut off all the rind and pith. Over a medium sized bowl, carefully slice between the membranes to remove the fruit in sections, catching any juice and the fruit in the bowl.
  6. Arrange the sectioned grapefruit over the salad.
  7. Toss the walnuts over the top.
  8. Lift the shallots out of the vinegar carefully, reserving the vinegar for the dressing. Pulling the rings apart, scatter the shallots over the salad.
  9. Drain the currants, and toss over the salad.
  10. Add 1-2 tbsp grapefruit juice to the  small bowl with the champagne vinegar. Whisk in olive oil, 1/2 tsp sea salt, and a few grindings black pepper.  Dress the salad – you may not need all the dressing.
Candied Walnuts
(can be quadrupled!)
  • 1 cup large walnut pieces (mostly halves)
  • 2 tbsp maple syrup
  • 1 tbsp sugar
  • 1/2 tsp kosher sea salt
  • several grindings of pepper
  • an optional pinch of cayenne (I liked it; my kids, not so much)
  1. Preheat the oven to 325.
  2. Toss all ingredients together in a medium sized bowl.
  3. Lightly spray a rimmed cookie sheet with vegetable oil.
  4. Spread the coated nuts over the cookie sheet.
  5. Toast for 15 minutes, stirring every 5 minutes.
  6. Remove from oven and cool stirring every few minutes so they don’t stick too badly to the pan.
You might think you’re mad at me when you see how the maple syrup and sugar seem welded to the cookie sheet. Don’t worry. Pour a cup or two of very hot or boiling water over it and in a few minutes it will wash right off.

Mission Figs and Blue Castello

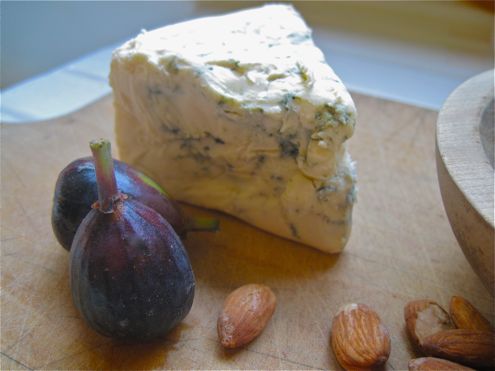
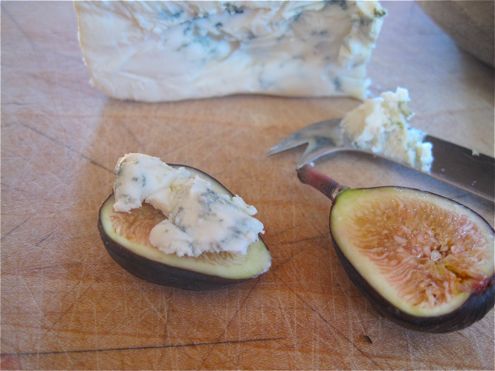
When we go on vacation, I’m always sure I’ll post at least something short at Notes on Dinner, but it never really works out that way. I took pictures on the trip though and now I have something very easy for August: figs and blue cheese for an appetizer, although it might also be dessert. Oozing creamy cheese shot with threads of sharp blue underscores the sweetness of black figs, sticky with juice. An old wooden board, a knife, a little glass of crisp mineral-y wine. It might seem off the cuff, even haphazard, but it’s not. This is laid back yet composed; some might even say elegant. (That might be me!)

I won’t call this a recipe and it seems silly to write it all out but here’s how it works:

  1. Buy a basket of Black Mission figs and a wedge of Blue Castello or a similarly rich mild blue.
  2. Rinse figs.
  3. Unwrap cheese.
  4. Get knife.
  5. Serve on a cutting board. I like to let people cut the figs and cheese themselves.

That’s it. The only little nicety you might add, if you get to the market in the morning, is to pull the cheese from the icebox an hour before you eat. You could also put a few almonds or walnuts out – they’d be even prettier served in the shell with a nut cracker.  We had a glass of chilly rosé with our figs, blue and almonds and that was just right.

Welsh Rabbit Redux

I’m going to have to call this dish “rabbit”, not “rarebit”. I was reading about Welsh Rabbit on Wikipedia and here is a quote about the use of the term “rarebit”:

In his 1926 edition of the Dictionary of Modern English Usage, the grammarian H. W. Fowler states a forthright view: “Welsh Rabbit is amusing and right. Welsh Rarebit is stupid and wrong.”

Fair enough is what I say. All I’m looking for is an easy dinner that is not the same old thing we always have. So, because I was asked to by a reader, I am exploring Welsh Rabbit. Last night I took a pass at it.

Since I am staying at my mom’s house, I decided to start with Mrs. Beeton’s Book of Cookery and Household Management – I wish I had my own copy; it’s instructive and hilarious. Incidentally, Mrs. Beeton refers to the dish as “rarebit”. Mrs. Beeton’s is a compendium of all household work, much cooking, but also decorating, home economics, etiquette and childrearing – all are covered. Her book has been the English person’s source for classic English dishes. Mrs. Beeton’s Welsh Rabbit recipe isn’t all that different from the sauce that I make to put on penne for macaroni and cheese, so I passed. I didn’t want to make the same-old-thing-but-on-toast. A big mistake – I should have stuck with the familiar here, as that is the whole point of this kind of dish. I turned to Joy, a book I would call the counterpart to Mrs. Beeton’s in the States. My mother has the 1975 edition, if you’re curious. Joy refers to the dish as “Welsh Rarebits”…(should I let them know that this is “stupid and wrong”?!)

There are two recipes included; one using beer, the other milk. I wanted something different so I decided on the one with beer. Also, I liked the sound of Worcestershire, paprika, curry powder and cayenne (I substituted Tabasco which is what my mom had in the house. I know the Tabasco was not the big problem with the dish)

I just want to give you an idea of how it works. I can’t give you a recipe in good conscience – you don’t really want to make something that even your significant other will think of as “kind of yucky”. On the other hand my mom said she liked it. However, this is how she put it: “If I don’t have to make dinner, it tastes 600% better.” I have to factor in that statement. Also my mom is predisposed to like British food because she grew up in England. She said the Rabbit tasted like pub food. I think this was supposed to be a big compliment, although since she was very young when she lived in Britain and also since it was just after WWII (AND she hates beer!) I am not sure how much real experience she has with pub food.

Anyway, what you do is melt a little butter in a double boiler over simmering water and add a cup of ale. When it is warm, whisk in a pound of grated sharp cheddar (aged less than two years – if it is aged longer than that you will have problems with the fat separating out of the Rabbit and pooling in unattractive puddles on the top.) When the cheese has melted and the sauce is smooth, add a lightly beaten egg, whisk and add the seasoning. Honestly, I would give the measurements but I really don’t think you should try this. It was not good.

The sauce was quite runny. Like thin gravy. The color was French mustard yellow. I was concerned that it should have been a spoon-coating thick sauce, like a thick melted milkshake, so to thicken it up I had Martin make me a little roux which he cooked separately while I whisked and peered anxiously into the pot. The roux made for a markedly thicker sauce, but I shouldn’t have bothered. The photo on Wikipedia shows a soupy cheese sauce on toast. My sauce was so unattractive, I poured it over the toast and ran it under the broiler. My mom said my grandmother used to broil her Welsh Rabbit. She did the milk and white sauce kind. Browning the top helped the visual appeal to a degree.

When we sat down to eat everyone except my mom looked skeptical and glum. It was a “what is this?!” kind of night. The kids dutifully took one bite and that was enough for them. The bread, mushy under the mantle of sauce, had a sad and mealy kind of texture. The sharpness and saltiness of the cheese was underscored by the Worcestershire and the mustard but not in a good way. The curry was just plain weird.

You may think I am crazy, but I still have hope for Welsh Rabbit. Next time I’ll try the kind with milk but probably not until the memory of this debacle has faded.

Macaroni and Cheese

I was going to make Welsh Rarebit today. This morning, during a remarkably peaceful breakfast with the three monkeys, I decided to hash out the dinner menus with them so they would know what was coming over the next two days until Martin gets back. I got huge push back on the Welsh Rarebit. Since it’s fencing practice tonight, and we’ll get back late, I decided that this “weird” version of toasted cheese (Welsh Rarebit has beer in it – it’s still the most innocuous dish) might push the carefully orchestrated balance of the household into bedlam. So I am scrapping the Welsh Rarebit idea.

Mac and Cheese. Doesn’t everyone already know how to make this?  Or at least where to look if they want to try?  I’m not sure.  So many people rely on the bunny version. The real thing is what we have around here. When I first started cooking for my kids, this was a once a week habit. Now it’s been a long time since Mac and Cheese was my back pocket dish. With Martin out of town though, familiar dishes are another way of keeping the volume down.

I also make Mac and Cheese when my brother and his family come to visit. My feeling is that visiting children who have taken long plane rides need and appreciate familiar foods. So when my brother rolls his eyes and says”  Mac and Cheese?! Isn’t there like a pound of cheese in that and a 1/4 pound of butter?!”  I just shrug and know that he’s happy that his boys are happily scarfing down plates of gooey pasta and will toddle off to bed without much of a peep. Matt, the mac and cheese is my gift to you!

I serve mac and cheese with hot buttered peas. I will not make excuses for all this butter.

Mac and Cheese

20 minutes of efficient work, 30 minutes in the oven

People get all nervous about white sauce, or bechamel. They are afraid it will be pasty and gloppy or that it will scorch badly and that the pan will be impossible to clean. It’s all about regulating the heat. A heavy bottomed pot does make a huge difference. That being said, before I got married, I made this for years in a old Revere-ware pot with a wobbly handle (that I inherited from my great-aunt) with great success. You just have to watch the heat and keep on stirring so it doesn’t scorch on you.

I love to make bechamel actually. The way the sauce goes from soupy-milky  to velvety-spoon coating in a matter of minutes makes me feel like a scientist. If you’ve never made it before, watching the transformation is very satisfying.


  • 4 tbsp butter + 1 tbsp butter, separated
  • 4 tbsp flour
  • 2 1/2 c milk, can even be 1% lowfat
  • 1/4 tsp dry English mustard
  • 1/8 tsp cayenne pepper – gives the dish a just perceptible heat
  • 1/2 tsp salt
  • freshly ground pepper
  • 4 ounces grated sharp cheddar – aged no more than 2 years
  • 4 ounces grated Monterey jack
  • 1 end of a loaf of sandwich bread, made into bread crumbs in a clean coffee grinder – or 3/4-1  cup fresh bread crumbs
  • 1/2 lb pasta, elbows are traditional but we like shells, farfalle, and penne
  1. Start a large pot of water to boil.
  2. Preheat the oven to 375 F.
  3. Add salt to the water and cook the pasta according to the time on the box. Drain.
  4. Mix the flour, dry mustard and cayenne in a small bowl.
  5. Over medium heat, melt the 4 tbsp butter in a heavy bottom sauce pan. Don’t brown the butter, just melt it.  When the butter is melted, add the flour, mustard, cayenne mixture and whisk for about a minute. Timing and temperature are key. If the heat is too low or if you don’t cook it long enough, that’s when you get a pasty, institutional tasting sauce. If the heat is too high, the sauce will scorch. If either of those things happen, you’ll wish you’d left dinner to the bunny mac people. The first few times, just pay attention. This really is the easiest thing. On my stove, and all stoves are different, the heat needs to be just slightly warmer than medium.
  6. Add the milk slowly, whisking all the while. I am right handed and I pour the milk with my left hand, while whisking confidently with my right. Initially this was like patting my head and rubbing my stomach – I’ve come a long way since then. Probably you are more coordinated than I am. Anyway, the milk and flour mixture will seize up at first and look uncompromisingly lumpy. Just keep on whisking – confidently. Get all the lumps.  Lumpy white sauce is another thing people fear – with good reason. You follow the directions and you won’t have to worry about lumps.
  7. Once all the milk has been added and all of the lumps whisked away, you might think that the sauce looks unpromisingly thin. You may wish that you had used whole milk or even cream. Fear not. This is the fun part! (I really do not get out enough – oh well)  Turn up the heat to medium high and continue to whisk. When the sauce begins to simmer around the edges, it will magically thicken – not suddenly, just consistently. You will see that the bechamel has the consistency of melted milkshake or very heavy cream. Some might say to whisk for 10 more minutes, but I say that would be overkill for this dish.
  8. Take the pan off the heat and go check your email. This will allow the sauce to cool slightly and then the cheese won’t become grainy. It’s not the end of the world if this happens, it’s just nicer if it doesn’t.
  9. Add the cheese, salt and pepper and whisk. Taste for salt and pepper and add more if necessary.
  10. Mix in the cooked pasta and pour everything into a gratin dish. Mine is ceramic, about 1 1/2″ deep. The dimensions are 7″ x 10″
  11. Melt the last tbsp butter and stir in the fresh bread crumbs. Sprinkle over the top of the mac and cheese.
  12. At this point you could cool it then wrap the whole thing up and put it in the refrigerator until you bake it. Up to 24 hours later.
  13. Or put it in the oven for 30 minutes, until bubbling

The last time I made this I made the mistake of adding some blue cheese, the remnant of a wonderful creamy French one. It was only fun for the grown-ups though and so I will probably never do that again. The look of sheer dismay, betrayal and utter shock on my oldest child’s face cured me of messing with familiar perfection.