Tag Archives: fast

More fun with beets

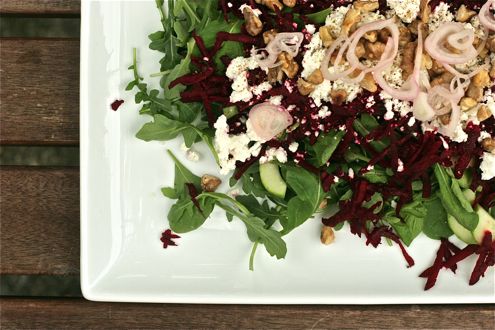
As if they weren’t already wonderful enough roasted and tossed into a salad! Those little beets you get in the summertime, red or chioggia, don’t need any cooking at all. All you have to do is peel them and grate them on a box grater. 2 small beets for 1 big salad – I use arugula or little gem for greens, cucumber, shallots, goat cheese, toasted walnuts. You can see how I made the first beet salad here. Just substitute grated raw beets for the cooked. Now that’s fast.

Harissa: Just try this, please


It was an unassuming dark little blob, nudged onto the corner of an oval platter of creamy hummus, almost hidden beneath a tangle of long cooked greens (chard maybe?!) and a scattering of currants. It’s not like I’m unfamiliar with harissa. I’ve had it on a couple of other occasions. Swirled into creme fraiche, harissa came with a heap of blisteringly hot matchstick french fries at one of my favorite restaurants in Portland. So, I was inspired to buy a jar as I tried to copy another restaurant dish for my birthday party last fall. The prepared harissa, though, was a disappointment and it kind of wrecked the whole meal for me. The little jar with the bright yellow Moroccan pattern on the label looked promising but tasted one note: hot-sweet and tomato-y. No sultry bitter complex fire, which is what I wanted. What I remembered from the Portland restaurant. That little jar has been languishing in my fridge long forgotten, and I bet I’ll toss it next time I see it.

So last week, when my friends ordered the chickpea puree at Sitka & Spruce, I was non-plussed when I saw the harissa, a wall flower hanging out on the edge of the plate, not even seeming to merit mention on the menu. I’ll pay no attention to that, I thought. I’d forgotten how enamored I’d been initially. The puree was fantastic though – I think there was a smattering of walnut or walnut oil, but toasty not bitter like the bitterness you find in tahini. So I ventured toward the harissa, which was darker, less tomato-y looking than the one I bought.

I tore off a piece of the rustic, slighty sour bread and dabbed it into the blond puree, then dipped the tip of my knife into the dark daub. Scent preceded taste: smoke! Then a bite. Oh, so that’s what it should taste like! Here was deft bitterness and deep smoldering heat. A muted lemon note. A complex counterpoint to the creamy foil of the chickpeas. So now I’m infatuated; this is a tiny bit inconvenient because harissa doesn’t seem to be the most kid-friendly condiment.

But therein lies the beauty!  Hummus=healthy, kid friendly albeit slightly bland snack food. Hummus+harissa=sophisticated, sultry fare perfect for grown-ups. Potato chips=blandly attractive and kid-friendly. Harissa+creme fraiche+potato chips=spellbindingly cool, adult nibble, perfect with cocktails. Do you see where this is heading?! I hope I am not overstating the allure of harissa. (I am often guilty of overselling.)

The first batch I made was too small. First of all, the four adults at dinner ate the whole batch in one go; second of all, it was so small my food processor couldn’t whirl it around effectively. I ended up chopping it finely with my chef’s knife and that was fine but if you’re in a hurry, definitely double the recipe. You’ll certainly eat the whole batch before the week is out. Now that I know how easy it is to make harissa, I’ll never buy it again.

And now I can revisit that so nearly wonderful birthday dish and share it with you next time. It was on the very verge of incredible and with this harissa, I know it will be perfect.

Rosemary skewered lamb with Israeli couscous, preserved lemon, hazelnuts and harissa

Harissa

  • 12 dried chile de àrbol
  • 3 cloves garlic
  • 1/2 tsp salt
  • 2 tbsp olive oil
  • 1 tsp ground coriander
  • 1 tsp ground caraway
  • 1/2 tsp cumin
  1. Soak the chilies in hot water for 30 minutes.
  2. Drain and cut in half lengthwise. With the tip of a sharp knife, scrape away the seeds and discard.
  3. In the food processor, whirl the chilies, garlic, salt and oil. Purée until smooth. Add the coriander, caraway and cumin and continue to process until smooth.
  4. This will keep for a month in the refrigerator in an airtight container with a slick of olive oil over the top. But I seriously doubt it will last that long!

After School Snack: Cardamom Scented Mango Lassi

Even though I love to cook, I never cook with my kids. Why? It’s too messy for one thing. For another, the older kids have gotten minor cuts while chopping and that makes me nervous. Frankly, the kitchen is an excellent place to temporarily check out from parenting – I like the focused solitary activity. Besides, the work I do there is still in service of my family. If I’m acting escapist in hiding out and chopping, so what? When I’m done, we’ll have an excellent dinner. I don’t want to manage developing knife skills, cross-counter trails of sugar, or little hands sticky with raw eggs. (How awful it is to confess to that!) Moms are SO not supposed to admit to these kinds of feelings. Sigh. I’m not going to worry about it though. There are other things to do.

After I read Madhur Jaffrey’s autobiography Climbing the Mango Trees, I thought: I want that kind of childhood for my kids, those kinds of food memories, the tumult of food culture that shaped her life. I imagine her in long braids and a bright dress, banging through the kitchen door after school, welcomed by a round terra cotta bowl of creamy basmati rice pudding scented with cardamom and garnished with shattered toasted pistachios. Or waking to a winter breakfast of daulat ki chaat, whose ingredients include fresh whole milk, seafoam and dew. (Dew!?!) Ms. Jaffrey describes this “heavenly froth” as “the most ephemeral of fairy dishes”.

Ok, ok. I know I can’t collect dew on the roof of my house and come up with some magically memorable breakfast. I can’t even get raw milk very easily. (Anyway, think of the bacteria!) And sea-foam? Forget it. I’m imagining the looks on their little faces if I told them that no, we aren’t having waffles and bacon for breakfast, instead, how about milk with sea-foam and dew!?! I want them to be able to roll with it, but maybe not that much.

Still, I think there are things I can do if I want to give my kids incredible food memories. Imagine getting off the school bus in Seattle, rain running off the shoulders of your parka, and stepping into a warm kitchen. There on the counter, a clear pitcher of golden creamy mango lassi, drops of condensation glistening on the sides.  Serve it cold. Listen for the delicate slurp as you pour it into a glass. Pay attention and catch that earthy lemon scent of cardamom. Isn’t it lucky Ataulfo mangoes are everywhere in late spring?! This has to be a step in the right direction.

Ataulfo Mangoes

Mango Lassi

  • 1 cup mango, cut from 1 ataulfo mango
  • 1 cup yogurt
  • 1/2 cup ice water
  • 4 green cardamom pods
  • 2 tbsp sugar

This couldn’t be any easier.

  1. Put all the ingredients in your blender and whizz for 2 minutes.
  2. Push the lassi through a sieve with a spatula or wooden spoon to remove the pulverized cardamom.
  3. Pour into a glass and drink.

The hard part could be figuring out how to get all the flesh off the mango. A friend from New Zealand taught me. Here’s how:

Get started by slicing the sides off the mango

Cut a grid into the flesh of the mango

Tidy little cubes of mango

Next, peel the core and slice against the pit to remove all the mango flesh

Like I said, I don’t usually bring the kids into the kitchen when I’m working. For lassis I can make an exception.


Spring green: Roast Asparagus Salad

I have been having an incredibly good time in my kitchen this week, inspired by the first sunny and (slightly) warm weather we have had here in Seattle since…September? Seattle is blooming and everything that has been brown and wet for so long is now green. (And wet. Sigh.) Still, the green is a huge improvement. Now I want to make green food.

First there was the riff on a dish of black rice, clams, aioli and cilantro that I had at Sitka and Spruce – except I made it with sear-roasted halibut. The cilantro made it a little bit green. I loved seeing it bright and fresh in the photo. The flavor with the lemon was pure sunshine. Here’s what it looked like:

My friend Christine thoughtfully brought over an Alsatian Riesling to drink with it and it was perfect, more so because I got to share it with a really good friend. As soon as I have a chance to make the halibut again, I’ll  take pictures and post the method. I want to show you how to make aioli.

Still, I wanted the food to be greener. So I made up this very very green salad – toying with a dressing from Deborah Madison, spring asparagus, arugula, goat cheese and toasted pine nuts. Here it is:

So, there’s the bitter asparagus and the even bitterer arugula. But the asparagus’ pungency is tempered by it’s bout with the broiler. The flavor becomes rounded, richer, a little nutty. The goat cheese was something leftover from the dinner party, the sort with colored peppercorns. Martin toasted the pinenuts – for warmth and crunch. Then there’s the dressing, borrowed from Deborah Madison’s Vegetarian Cooking for Everyone. I skipped a couple of things – the big one being the capers. Here’s what Nora Ephron says about capers:

Any dish that tastes good with capers in it tastes even better with capers not in it.

I agree 100% and I feel validated in my opinion because Nora Ephron said it first.

Anyway, the dressing. I made it for this cabbage and arugula slaw that I was sure would be wonderful (it wasn’t) but the dressing had potential. (without the capers!) Garlic, salt, fennel seed and black peppercorns are mashed together with a mortar and pestle and then left to macerate with olive oil, shallots and lemon rind. It’s complex. Fire from the garlic and peppercorns, high spring notes of fennel and lemon and the edge-y richness of sliced shallots and champagne vinegar. Without the capers, it’s pretty fantastic. This is an extremely green, salad tour de force. I think after this cold and gloomy winter what I needed was a giant hit of chlorophyll.

With the salad, we made the grilled shrimp with bread crumbs from Marcella Hazan’s Essentials of Italian Cooking that I wrote about last summer and the white bean and basil puree that I wrote about when I first started writing Notes on Dinner.  And here is how to make the green salad:

Asparagus Salad with Arugula, Goat Cheese and Pine Nuts – serves 4

  • 1 bunch of asparagus, rinsed, ends snapped off
  • 2 tbsp olive oil
  • sea salt and pepper
  • 4 generous handfuls of arugula, washed and dried
  • 1 ounce goat cheese – with peppercorns, if you like that sort of thing, crumbled
  • 2 tbsp pine nuts, toasted in a small dry skillet over medium heat until glossy and golden

The Dressing (for this you will need a mortar and pestle)

  • 1 clove garlic
  • 1/4 tsp sea salt
  • 1/4 tsp fennel seeds
  • 1/4 tsp peppercorns
  • 1/2 tsp dry tarragon
  • 1/4 cup parsley, minced and divided
  • 1 shallot, thinly sliced
  • 1 zest of a lemon – finely grated with a microplane
  • 1/3 cup olive oil

Preheat the broiler – set it to high.

In the mortar and pestle, mash the garlic, sea salt, fennel seeds, peppercorns, tarragon and 2 tbsp of the minced parsley until you have a smooth paste.

Stir in the lemon zest, shallots, the rest of the parsley and olive oil and leave to macerate for 1/2 an hour.

While the salad dressing is resting, arrange the arugula on a large platter.

Then toss the asparagus with 2 tbsp olive, 1/2 tsp sea salt and several grindings of black pepper on a rimmed sheet pan. It should be in one layer. Broil 4 inches from the heat until bubbling; toasted but still crisp/tender. My asparagus was just under 1/2″ in diameter and this took about 2 minutes per side – a total of 4 minutes.

Remove the asparagus from the pan and arrange while still hot, over the arugula.

Strew the crumbled goat cheese and pine nuts over everything.

Add the champagne vinegar to the dressing and taste. Does it need more salt?

Ladle the dressing over the salad – depending on how much asparagus and arugula you have, you may not need all of it.

So I have this photo of the dinner and I’m not crazy about it. I don’t like to make excuses when I think something is lame; as my aunt says: you have to feign nonchalance in these situations. But this is sort of funny. My boys were so desperate to get their hands on this dinner (they both love Ms. Hazan’s juicy and crisp shrimp) that when I wanted to stop for less than sixty seconds to take the picture, they both started to cry! So I stopped messing about and served dinner. Everyone was happy. Here’s the photo:
It could have been a lot prettier but seriously, it was totally delicious.


Codcakes – really?!

Really. And believe me, I was skeptical. My friend Liz made them first from a recipe collection she got from me! Codcakes. It’s sounds like the sort of tame and ridiculous expletive my mother sometimes uses – “Fishhooks! Codcakes!” I would never say that and if you’d asked me a week ago, I might have said I would never make codcakes either. I imagined something leaden. I worried they’d be fishy – not in a good way. Codcakes sound like the kind of thing an old person would make to use up leftovers. But Liz liked them. In fact I believe what she said was “Sarah, you have to try them. They’re totally excellent!” She was right and I was completely wrong.

I wouldn’t admit this to a true crab cake connoisseur because it would  probably lead to a long and boring argument, but for a fast last minute weeknight meal that won’t threaten your retirement savings, these are pretty close to crabcakes. Really very delicious. Crisply browned on the outside in olive oil, tender within and greenly perfumed with basil. The garlic gives them a little attitude. If you don’t agree that they are wonderful after trying them, I’d love to know why.

Codcakes with Basil Aioli

This recipe can be doubled very easily. The five of us demolish a double recipe every time.

  • 1/2 c. mayonnaise
  • 2 tbsp lemon juice
  • 1 clove garlic, pressed or minced
  • 1/4 cup fresh basil, chopped
  • Sea salt, pepper
  • 1 pound cod fillets, skin removed
  • 1 1/2 c. panko, divided in half
  • 1 egg
  • 2 scallions, minced
  • 1/4 c. olive oil

First make the sauce.

In a food processor or blender, process mayonnaise, lemon juice, garlic and basil until pale green and smooth.

Scrape the aioli into a small serving bowl and, without bothering to clean out the bowl of the food processor, pulse half the cod into a combination of finely minced and chunky pieces. Transfer fish to a large mixing bowl and process the remainder of the cod.

Using a large sturdy spatula, mix all the processed cod in the mixing bowl with 3 tbsp of aioli, 3/4 c. panko, 1/2 tsp sea salt, 1/2 tsp pepper, the egg and the scallions. It should look like this:

Form the mixture into patties – these could be quite small – 2″ is good for small children. 3″ would be fine for adults. Put the remaining panko on a plate or wide bowl, and press  all over the patties.

Heat the olive oil in a non-stick pan over medium-high heat. Don’t start cooking until the oil is shimmering. This is important and the difference between stodgy-greasy and golden-crisp. Sometimes I put the pan on the heat and walk away for a few minutes to chop a clove of garlic or change whatever music I happen to be listening to. Acquiring the patience for the pan to get hot enough took me a long time. Let the pan sit on the heat for at least 3 minutes.

Add the patties to the pan and cook about 4 minutes per side, until golden. Serve with aioli or if you have a child who is acting very silly (I did) with ketchup. The aioli also goes very well with steamed or roasted asparagus. You may want to add a little extra of everything to the sauce – you’ll want more.

Like spring: Royal Trumpets, Asparagus and New Potatoes

I was pushing the cart around the vast islands of produce at the grocery store the other day, knowing I would incite a full scale revolt if I brought any more kale into the house. Sometimes it is overwhelming, wanting to try something new and having no idea what it should be – especially towards the end of winter. There just aren’t a lot of choices in early spring in the PNW.  Anyway, staring out over the vast expertly displayed mountains of mostly green crinkly leaves (those winter stalwarts—kale, chard, escarole), there beyond that, the mushroom display. Chanterelles!?! Love them. Nope. That’s fall. Then I saw these:

Royal Trumpet Mushrooms


Hmm. They look a little like this Swedish type called Karljohan which I have always wanted to try. Royal trumpet mushrooms are handsome. Creamy large fungi clustered with smaller, sometimes tiny, versions of themselves, they sport a broad cappuccino colored cap. Royal trumpets look like storybook mushrooms. Suddenly, I imagined them cut in rough pieces, their edges sizzling and caramelizing in butter. The fresh loamy scent transformed, intensified, browned and buttery, and scattered with crystals of seasalt and scented with black pepper. I put half a pound in a paper bag and trolled on. On the opposite bank were slim green spears of asparagus. So spring-ish! Popped them in the cart. On the other side of the large wooden crate, a heap of small purple plastic mesh bags of tiny new potatoes, the largest potato no bigger than those shooter sized marbles. Yes. Done.

The thing is, I know none of these vegetables are seasonal here in Seattle – not at this time, in March, except maybe the potatoes. Those I think were from Oregon. But I didn’t care. Not this week. I am so ready for spring!

Royal Trumpets, Asparagus and New Potatoes

  • 1/2 lb Royal Trumpet Mushrooms, wiped clean and cut into 3/4″ pieces
  • 1/2 lb Asparagus, thin as pencils, snapped into 1 1/2″ lengths
  • 1/2 lb tiny potatoes, peeled
  • 1 1/2 tbsp butter
  • 1 1/2 tbsp olive oil
  • Sea salt and freshly ground black pepper

Here’s where I had trouble deciding whether or not to include this recipe at Notes on Dinner. I have this incredible gadget that my mother-in-law brought me from Sweden. Can you guess what it is?

This is a Swedish potato peeler although if you guessed a salad spinner you wouldn’t have been far wrong. It does have another basket that fits inside and it can dry lettuces too. I really hate to write about specialized equipment and it does seem especially unfair given that these potato peelers are nearly impossible to buy outside of Sweden, or in the U.S. anyway. You put the potatoes in the bowl, then fill the bowl with water and turn the handle quickly. The centrifugal force flings the potatoes against the sides and the tiny sharp ridges sand away the delicate skins of small potatoes. The water washes their grubby little skins away.

It is only 1/2 a pound of potatoes. So…

  1. Put the potatoes in a saucepan and cover them with water. Heat until boiling then add 1 tsp sea salt. Simmer until just done. If the potatoes are really quite small this could take no more than 10 minutes. Start checking at 8 though, just to be safe. When the potatoes are done drain them, and set aside.
  2. In a large non-stick skillet over medium high heat, melt the butter with the olive oil.
  3. Add the mushroom pieces and the potatoes, stirring every minute or two until they are light golden brown all over.
  4. Add the asparagus and continue to stir until it is crisp-tender and also, if you look carefully, lightly browned.
  5. Add sea salt and black pepper until it tastes delicious. (I would start with 1/2 tsp of salt and add 1/8 tsp increments until it is just right for you.)

I served this with that Tom Douglas fish recipe I wrote about months ago. This time I used cod, though, which was really so much better than the halibut I used last time. The finished recipe has this mild heat and lemony edge which I loved alongside those nutty forest-y mushrooms and potatoes. The parsley salad was the icing on the cake, so to speak. If you are curious, my kids loved this dinner. One of the very best. (They did, however, skip the parsley salad.)


Shades of Fog City – Lamb Burger with Chutney and Smoked Cheddar

When I first moved to San Francisco, I occasionally visited a restaurant called Fog City Diner. A well-heeled but touristy place at the base of the Filbert Steps, Fog City was an out-of-towner and yuppies’ haunt. Singles crowded the bar and the bridge and tunnel set hogged the booths. Often you had to wait forever for a table and  sometimes the food and the service were uneven.

Still, I kept going back because there were a few things I loved about Fog City. One, they made a perfect Pimm’s Cup. Okay I did have to coach the bartender a little bit on how I like it – with fizzy lemonade and a long slice of cucumber, but he was game. The lemonade was made from fresh lemon juice, simple syrup and soda and it made an excellent Pimm’s. Also, the onion rings were exemplary: a crisp cloud enclosing an almost melting interior onion. My favorite though, was the lamb sandwich on focaccia with homemade chutney.  I seem to remember that it was apricot, but it may have been tomato. Whatever. Whether tomato or apricot, it was spicy and floral with that chutney tang I love. The rosy, gamey lamb, the tangy chutney, the chewy focaccia – it was perfect.

Perhaps you think a proper British Pimm’s Cup would be out of place with something so flavorful and almost exotic? No. Not for me anyway. The spicy, sweet Pimms found its match in the spicy, sweet sandwich. And all those people lurking at the bar, wheeling and dealing or on the hunt? Why would anyone subject themselves to that racket after a long day at work? I didn’t even notice them once we scored the booth. Socked in by the San Francisco fog, the restaurant glowed like a beacon. I would run for the glowing windows from work to meet good friends. Cozied up together in a booth, chatting happily and looking out at a gloomy night with the perfect sandwich – who cares if you’re surrounded by yuppies on the prowl?

Fast forward and 20 years later, here I am in Seattle, three kids, a husband, a dog and a cat – I am not running around at night, my mouth watering for a lamb sandwich and a cocktail that complements it perfectly (although some nights I might wish I were). I can’t go back to being twenty-two. Maybe though, maybe, I can conjure up something like that sandwich, since I definitely can’t go back in time. Some weekend in the future, when I have all the time I need to roast a leg of lamb and make focaccia, and whip up a little homemade tomato chutney, I can make the lamb sandwich exactly the way I remember it. Tonight I was in a hurry though – and this quick version made me smile:

Lamb Burger with Chutney and Smoked Cheddar – serves 4

  • 1 1/2 pounds ground lamb
  • 1 slice white sandwich bread, processed into fine crumbs
  • 2 tbsp milk
  • 1 clove garlic grated on a Microplane or pressed in a garlic press
  • 3/4 tsp salt
  • 3/4 tsp freshly ground black pepper
  • 2 tbsp Major Grey’s Chutney, plus additional to serve – I like Patak’s which has a looser set than most chutneys
  • 1/4 pound smoked cheddar – I used Beecher’s
  • (4) brioche buns
  1. Heat a gas grill on high for 15 minutes. Then turn down one (or two – if you have a three burner grill) of the burners to low, so that one burner is left on high and you have a cooler part of the grill to heat the buns.
  2. While the grill heats up, in a medium sized bowl, combine the bread crumbs, the milk, the garlic, the 2 tbsp chutney and the salt and pepper. Mash with a fork until the bread crumbs have formed a thick paste.
  3. Add the ground lamb to the bowl and combine the lamb with the paste lightly but thoroughly with your hands. Form into 4 equally sized patties.
  4. Spray each patty on either side with olive oil.
  5. When the grill is hot, place the patties over the hottest burner for 3-4 minutes, closing the lid. Then turn the burgers, again closing the lid,  and set a timer for 2 minutes. After two minutes, place a slice of smoked cheddar on top of each burger. Close the lid again!
  6. When there is just about 45 seconds left, lightly toast the brioche – be careful! Brioche burn so easily!
  7. Serve immediately accompanied by more chutney.

Remembering Russian Hill – A very quick pasta for winter

When I first moved to San Francisco I lived in Russian Hill, which in retrospect was like living in a village within the city. Perched high up above North Beach and Van Ness, Russian Hill felt like a remote hill town in Italy. The bustle of San Francisco was all around, but that was at the bottom of the hill. At the top of the hill, embedded in the mass of apartment buildings, elegant townhouses and tiny parks were short strips of restaurants, dry cleaners and little dusty corner stores. Occasionally a tiny dress shop or gallery would appear…and then disappear. I was a regular at a bakery, a little brunch spot, my bus stop and a small, bustling restaurant.

It was at the intersection of Hyde and Union, and there were 3 or 4 little restaurants clustered at the corner. Intimate in size, not places to cross the city for (parking would just about kill you if you were driving ) but warm, welcoming and familiar. The restaurant corner was two blocks from my apartment. My favorite was the Italian one that was not called I Fratelli. I honestly can’t recall the name – I’m drawing a complete blank. This was not a restaurant that anyone (except me!) would ever write about. It was a very good place to meet another friend or two who also lived on Russian Hill. Which is one of the things I liked about it. In fact, one reason I loved that Russian Hill restaurant was because it was small and unpretentious and so completely removed from the chic, bourgeois, dressy Union Street and the funky, too touristy North Beach.

When I walked home in the dark after work (in my memory it is always wintertime – you would never go to this restaurant on a bright sunny day), I anticipated passing that little restaurant. The windows would be steamed up and there always seemed to be a seductive aroma ambling out the doors and down the street, drawing me in. The scent was of browning lamb chops and pepper, of arugula, shaved parmesan and spicy red wine – at least that’s what I always imagined. Even though the food wasn’t fancy, it was very good.  Through the window I could see the patrons, either tête à tête or in happy more boisterous groups. Everyone looked at home and relaxed. It was that kind of restaurant.

It was around that time that my friend Mark gave me River Cafe Cookbook (published in the U.S. as Italian Country). Rustic Italian cooking was a really big deal at the time and it seemed like everyone was talking, thinking, dreaming about it—including me. As I cooked my way through Ribollita, Cannellini Bean Soup, Pappardelle alle Lepre and the Polenta Almond Lemon Cake, I came upon Cloe’s Quick Sausage Sauce. I know, after all those pretty Italian names “Cloe’s Quick Sausage Sauce” sounds pedestrian and un-lovely. It’s not. The creamy fennel scented pork has a little hit of heat from the chilies, summery warmth from the tomatoes, richness from the cream and the complex tang you can only get from a good aged parmesan cheese. I’d had a similar dish at that little Russian Hill trattoria. On a wintery night, you could light the candles, pour a glass of wine and eat this; tête à tête or in a happy boisterous group. It will be wonderful I promise.

Cloe’s Quick Sausage Sauce, River Cafe Cook Book, Italian Country

Serves 6

  • 2 tbsp olive oil
  • 1 red onion chopped fine
  • 5 Italian sausages, spiced with fennel seed, removed from casings
  • 1 1/2 tbsp finely chopped rosemary
  • 1/4 tsp red pepper flakes
  • 2 bay leaves
  • 1 28 ounce can Italian tomatoes, drained and coarsely chopped
  • 2/3 cup heavy cream
  • 1 1/2 cups grated parmesan, divided
  • 1 pound pasta – I like cavatappi
  1. Heat the 2 tbsp olive oil in a 10 inch heavy sauté pan. sauté onions over medium high heat until browned.
  2. Add sausages, rosemary, red pepper flakes and the bay leaves. Mash the sausages over high heat until finely crumbled and continue to mash and push around for 20 minutes. They are done when they seem to have started to disintegrate. Don’t be lax here, and just break them up and leave them. Take the time to thoroughly break them up and keep going – it is key to the texture of the finished dish.
  3. While sausages are browning, start a large pot of water for the pasta. Once it is boiling, salt generously
  4. When 20 minutes is up, add the tomatoes to the sauce and return to a simmer. Remove from heat.
  5. When the pasta is cooked and drained, toss into the sauté pan with the sauce and add the cream. Heat until steaming, remove from heat and add half the parmesan.
  6. Serve immediately and pass the remaining parmesan at the table.

Fear of Frying: Kabocha Squash Tempura

A few weeks ago, I consumed a completely embarrassing amount of the most crisp, succulent kabocha squash tempura at the home of some really lovely people who I don’t happen to know very well and who are excellent cooks. (I felt SO lucky to be included!) We were standing around in their kitchen sipping one of those apricot-floral half dry German wines and smacking on the crisp golden edges of this squash which had been finished with the light crunch of sea salt. I was utterly gluttonous – we all were. Afterwards we watched as they cleaned and cut geoduck into satiny sashimi. If you have never seen a geoduck at all, seeing one being cleaned will be quite a surprise for you – I’m not kidding! I was delighted to eat geoduck sashimi but I will gladly leave the prep to someone else. The tempura, however, inspired me to address my deep rooted fear of frying things at home.

It’s not that I’m afraid I’ll set the kitchen on fire and I’m fine with the clean-up. I do own the kind of thermometer that can go in searingly hot fat. And I’m not afraid of cooking with fat for health reasons – once or twice a year making french fries, who cares?

Here’s what it is: I don’t want to own a deep fat fryer (too big and messy and they only do that one thing) and I hate the idea of having to fiddle around with the stove the whole time to get the heat right. I imagine I would be irritated if the oil starts to smoke too much or if the batter is too heavy or if the oil is not hot enough. And if the food comes out leaden and greasy? – I would hate that. Or if we’re talking fried chicken, what if the outside is golden and crisp while the inside remains scarily raw? Yuck.

Fried food must be crisp, golden, light – nothing short of perfect – the first time out or I don’t want to have anything to do with it. There’s no rescuing a failure in frying. Yet, despite all my nervous notions, I decided to try to make tempura anyway. The memory of that delicious tempura drove me to it.

Kabocha has a very tough exterior

The most difficult thing was slicing the kabocha squash which has an extremely beautiful but leathery skin. In the interest of keeping it very simple and because our hosts at the dinner party used it, I decided to buy a box of tempura mix – just add water and stir – so the batter was a no-brainer. (hey, what kind of cooking blog is this anyway?) Our hosts shallow fried the tempura, so I did too. Not a big deal. Very simple. The clean-up was a breeze.

Guess what? Making tempura was easy! Nothing to quail over at all.

Kabocha Tempura

  • 1 Kabocha squash
  • 1 box tempura mix
  • sea salt
  • canola oil for frying


With the squash set on a stable cutting board, slice down through the center firmly and carefully. I cut right down through the stem. Once you manage to slice through the exterior, you can wedge the blade back and forth a bit and gently force the halves apart.

With a soup spoon, scrape out the seeds and guts of the squash which are very similar to a pumpkin.

Sliced and peeled kabocha

Cut the halves into slices 3/8″ thick, then peel off the skin. Chill the squash in the refrigerator

Prepare the tempura mix, following the instructions on the box. I found I had to thin mine quite a bit with water. It should be thinner than pancake batter, just barely clinging to the squash.

Film a 10″ heavy bottomed saute pan with a 1/4″ of canola oil and heat until shimmering over medium high heat. If the oil starts to smoke, remove from heat until smoking subsides.

Crisp and almost done

Dip 3-4 slices of squash into the tempura batter. CAREFULLY lay them in the hot oil with tongs. The squash should take 3 minutes per side. You can check as soon as the batter seems to set – it should be barely golden when finished. Flip when the underside is golden and continue to fry for another 3 minutes.

When both sides are golden, remove the tempura to a platter lined with paper towels and sprinkle with sea salt.


These are very fine with cocktails.

I think of this shallow fried tempura as the gateway project to a whole world of deep fried foods that until now have seemed unattainable to me because of my fear and impatience. Look out – fried chicken and samosas are just around the corner!

If you are interested, here is a link showing how to clean a geoduck:

How To Clean a Geoduck

Carrot Cake

I haven’t always been a fan of carrot cake. To say that I actively hate carrot cake would be untrue but I’ve never craved it. (To put it in context- if you asked me if I’d like a slice of Roasted Clementine and Chocolate Tart? Yes please, I’ll take one right now!) Carrot cake doesn’t call to me that way. The truth is, until this weekend,  I hadn’t even eaten a piece of carrot cake in over 20 years.

Why? The memory of those sticky, bloated, too sweet raisins for one thing. And those crummy little bits of walnut. I love walnuts. Walnut cake, walnut ice cream, toasted walnut halves with beets. Walnuts are the king of nuts and it kind of drives me nuts (yes really!) to see them in a supporting role.  Would Laurence Olivier take the role of a mere page?! I don’t think so. I wouldn’t put them in brownies or chocolate chip cookies either. Don’t even get me started on that Carrot Cake / Pineapple variation. I’m not totally sure where this prejudice came from. But guess what? It all changed for me last weekend.

When I was asked to make a carrot cake for a fall baby shower, I was nonplussed. How about Parsnip Cake? – I thought, or Persimmon Cashew Cakes?!  Carrot Cake? But I could make anything you want! No, carrot cake please! was the answer – it’s perfect because it’s fall. So I did a little reading. I read every one of my carrot cake recipes. (There are so many!) Of course there are variations beyond mere pineapple! Of course you can skip raisins. Of course you don’t have to gutter the walnuts.

For example, carrot cake can have coconut instead of walnuts, currants instead of raisins. The sometimes gloppy and heavy cream cheese frosting can lighten up with lemon rind and juice. One can make beautiful ribbons of carrot, candied in maple syrup to garnish that swath of now tart ivory frosting. When I began to change up the classic recipe, the process started to get really fun! This was no tired, old-fashioned, cafe carrot cake, getting stale under a glass dome. No. I borrowed a little of this and a little of that, combined recipes and, wow -I guess I love carrot cake! Enough like the original not to disappoint a traditionalist but irreverent enough to please an obsessive cake eater like me. Very pretty too.

I combined fragments from Joy of Cooking, the Weekend Baker by Abby Dodge, the Barefoot Contessa Parties by Ina Garten, and The New Best Recipe from Cooks Illustrated. The stole of toasted flaked coconut is me. Thanks to Maria for the nudge which dashed all my boring preconceived notions. What a fun project. And it was perfect because it’s fall.

Here’s what I did. All of the parts are fast and beyond easy.

Carrot Cake with Lemon Cream Cheese Frosting

Preheat oven to 350.

  • 1 1/2 c. all purpose flour
  • 1 c. sugar
  • 1 1/2 tsp baking soda
  • 1 tsp baking powder
  • 1 tsp cinnamon
  • 1/2 tsp cloves
  • 1/2 tsp freshly grated nutmeg (or ground if that is all you have)
  • 1/2 tsp ground allspice
  • 1/2 tsp salt
  • 1/3 c. vegetable oil
  • 3 large eggs
  • 1 1/2 c. finely grated carrot
  • 1 cup shredded sweetened coconut
  • 1 cup currants
  1. Butter and flour (2) 9″ round cake tins.
  2. Whisk flour, sugar, baking soda, baking powder, cinnamon, cloves, nutmeg, allspice, and salt in a large bowl.
  3. Pour the vegetable oil into a 2 cup liquid measuring cup. Add the eggs. Whisk with a fork.
  4. Whisk the dry ingredients with the oil and eggs mixture until smooth.
  5. Fold in the carrots, coconut and currants until evenly combined.
  6. Divide the batter between the two cake pans and bake for 25-30 minutes.  Allow to cool in the pan for 10 minutes and then transfer to a cake rack to cool completely.

Lemon Cream Cheese Frosting in the Food Processor

  • 12 ounces of cold cream cheese
  • 1 c. unsalted butter – can be cold, better at room temperature
  • 2 1/2 c. confectioners suger, measured then sifted.
  • 1/2 tsp table salt
  • 3 tbsp freshly squeezed lemon juice
  • 2 tsp finely grated lemon zest (a good job for a microplane grater)

Place all ingredients into the bowl of a food processor and pulse until evenly combined. You may have to scrape the bowl once or twice. Do not over-process.

Maple Candied Carrots

  • 1 cup of finely grated carrot
  • 2 tbsp unsalted butter
  • 3 tbsp maple syrup

Melt the butter in a medium sized heavy saute pan. Add the carrots and the maple syrup. Stir over medium high heat until the liquid is reduced and the carrots are glistening. You will see small candy bubbles on the side of the pan, browning slightly.  The whole process of cooking the carrots should take about 3 minutes. Turn all the carrots onto a paper towel lined plate and cool.

Toasted Coconut

  • 1 1/2 c. wide coconut shavings

  1. Preheat oven to 300.
  2. Spread 1 1/2 c. coconut in large roasting pan.
  3. Toast for 10-15 minutes stirring every 5 minutes. Watch for burning.
  4. Transfer coconut immediately to dinner plate to stop browning.
  5. When cool, store for up to 2 weeks in a tightly sealed container.

Assembling the cake

  1. In the center of a 10″ or larger flat plate, dab 2 tbsp of the frosting.
  2. Center one of the carrot cakes on the plate using the frosting as “glue” to hold it in place.
  3. Put 3/4 of a cup of the frosting on the cake and spread carefully up to the edge.
  4. Center the second cake on top. Then, using a scant 1/2 cup of frosting, carefully spread a very very thin layer of frosting all over the cake. This is called a crumb coat and it will keep the frosting crumb free ( Crumb-y frosting looks very messy.)
  5. Place the cake in the refrigerator for a half hour so that the crumb coat has a chance to set.
  6. Then proceed to frost the rest of the cake.
  7. Holding the cake over a roasting pan or a half sheet pan to catch the falling coconut, press handfuls of coconut gently into the frosting until the sides of the cake are completely covered.
  8. Take about 1/2 cup of the candied carrots and looking directing down over the top of the cake, heap the carrots artfully right in the center. Ta-da!