Tag Archives: fast

Breakfast

What does a person, who mostly writes about dinner, eat for breakfast? One might well wonder. I guess I’m a creature of serially monogamous breakfast habits. Obviously I like variation at dinnertime, but not in the morning. Years  and years of eating the same thing for breakfast over and over again feels just right to me.

Right after college it was peanut butter and bitter marmalade on an English muffin and a cafe au lait. My roommate and I brewed these up in our Bialetti Moka Express on the funky Harvest Gold stovetop in our Russian Hill apartment. I think I ate that for breakfast for maybe ten or fifteen years.  Then there were a few years, maybe four or so, of poached eggs on toast. With a cup of Murchie’s Empress Afternoon Blend tea and a glass of orange juice. That was in the Pacific Heights apartment. After I met Martin, we ate boiled eggs with this kind of weird, pink, caviar paste. It came in a bright blue tube with a smiling, little, blond boy on the front. That phase didn’t last too long. I love Martin but that pink caviar is only ok. It doesn’t hold a candle to peanut butter and marmalade.

On trips to Sweden to see Martin’s family, I discovered all kinds of cultured milk. Kefir, filmjölk, all kinds of yogurt, quark, fresh cheeses. There began a long period of variations on yogurt for breakfast. Initially this led to making my own yogurt for awhile. Then kefir finally became available in the U.S., that was really exciting! (Yes, I do live in cave.) Lastly, Greek yogurt finally arrived, the richest, thickest, most luxurious of all. Martin started making a deeply toasted muesli with dried cherries. I got stuck on that with the Greek yogurt for a long, long time. Later, switching it up with honey, raspberries, some ground walnuts and a squirt of lemon juice, was heaven.

When winter rolls around though, raspberries become ludicrous. They fly in from South America and I think “oh – how fresh and so exotic in the wintertime”  but they’ve travelled miles to get to Seattle, and taste as if they’ve been around the block a few times. For something so mediocre, they cost the earth.  I tried the bags of frozen local berries but quickly tired of them.

Fortunately, a few weeks ago, in a little plastic box pushed out of sight behind the toaster and leftover from a wintery Sticky Toffee Pudding: I remembered – Medjool dates! (What?! You’ve never had Sticky Toffee Pudding? I will remedy that by posting the recipe at some point…) Their deep fruity caramel flavors are in perfect counterpoint to the brightly sour yogurt. Toasted walnuts left from a grapefruit salad added complex bitterness. I confess my sweet tooth doesn’t allow plain old yogurt: I needed something sweet. Dark Grade B maple syrup – we always have that in the fridge. Maple + dates  are made for each other– I will have to figure out a dessert with those two some day. The crown on this breakfast though, is the salt. A small but decisive pinch of kosher sea salt provides a glittering, edgy crunch. Perfection.

I think I will eat this until I am old and grey.

Yogurt with Dates, Toasted Walnuts, Maple Syrup and Sea Salt

  • 3/4 cup yogurt – read the ingredients list – there should be no additives, nothing to thicken it but the bacteria. My yogurt (Straus) has non-fat milk, buttermilk and the yogurt cultures. I also like the European Style Organic Plain Yogurt from Trader Joe’s
  • 2 tbsp grade B maple syrup
  • 2-3 tbsp (about 7 walnut halves) toasted for 10 minutes at 350. (I would toast at least a cup or so at a time)
  • 3 medjool dates, with pits, pitted. (Pitting is easy and I think the dates with pits taste better)
  • a pinch of Kosher sea salt (I like this one, as you may already know)

This is hardly a recipe, but here’s what I do:

  1. Take the kids to the school. Return home and take a deep breath. Take 15 minutes for breakfast.
  2. You’ll want your favorite bowl. I like a deep round one because it fits so nicely into the palm of my hand when I sit eating on the couch with the newspaper but I have a fond recollection of my mother-in-law’s wide soup plates. Soup plates work better on a table though. It’s your choice. Put the yogurt in the bowl.
  3. Drizzle 2 tbsp maple syrup over the yogurt (I have to confess I kind of love it when I “accidentally” pour in too much…shhh)
  4. With a small sharp knife, make a lengthwise slit down the dates. Push out the pit. I like the dates quartered the long way. Scatter them with the walnuts over the yogurt and maple syrup.
  5. Take that decisive ( not too much and not too little) pinch of kosher sea salt and strew it over the yogurt dates and walnuts.
  6. Get a soup spoon and sit comfortably somewhere, eating this magnificent yet simple breakfast, reading the paper, gathering your thoughts, then finally getting on with things.

The Moroccan Salmon Sandwich

There is a diner (the upscale yuppie variety) near my house called Skillet, which serves a extraordinarily good hamburger. I am somewhat of a devotee of the hamburger. (And I don’t mind much if it’s the posh kind or the fast food kind – if by fast food you mean Dick’s)  Anyway, at Skillet they have this condiment called bacon jam. It’s as heartstoppingly wonderful as it sounds. Of course bacon jam is heartstopping in every sense of the word. So much so, that having eaten at Skillet several times in the course of a few weeks, I felt I had to explore other parts of the menu. After carefully looking it over, and with a flicker of regret as I passed over the burger (bacon jam, arugula, creamy blue cheese), I ordered the Moroccan Sockeye Salmon Sandwich, which had condiments that sounded intriguing too: harissa aioli and crisp fried preserved lemons.

The salmon sandwich handily beat the hamburger – the epic Skillet hamburger with bacon jam. No kidding. Harissa aioli and fried preserved lemons beat bacon jam?! Yes they did. It’s true. Sharp bittersweet tang, then more sweet, and smoky too, the tangled crunch – oh just a little bit more – What?! How can it be all eaten up already?! I had to figure out a way to make this sandwich at home because ordering two would be embarrassing.

Guess what? It was easy. There are a couple of ways to get there too. This could be a project kind of sandwich, with toasting, grinding and soaking the spices for the harissa and the ras el hanout yourself or you can just buy them ready-made at a grocery store. Moroccan food has become ubiquitous in cities and I see these condiments all over the place. That being said I would not deny myself the pleasure of the scent of freshly roasted cumin, or the sinus clearing burn of roasted dried chili de arbol. (Please try making these condiments just once!) However, I do understand that this is just a sandwich. A fifteen minute proposition if you don’t make all the condiments yourself.

Removing the pin bones with needle nose pliers

Moroccan Sockeye Salmon Sandwich – serves 4 generously

  • 1 1/3 lbs sockeye salmon filet
  • 1 tbsp ras el hanout (see recipe below)
  • spray olive or canola oil
  • 1/2 c. mayonnaise (I like the Trader Joe’s brand)
  • 1/4 c. harissa (or to taste – see recipe below)
  • 1 medium sized preserved lemon, sliced thin, seeds removed and dried off with a paper towel (I prefer Le Moulins Mahjoub brand for their firm skin. It makes it a lot easier to slice. I bought them at the grocery store)
  • Canola or peanut oil
  • 1/4 c. rice flour
  • 1 tbsp cornstarch
  • 2 handfuls of arugula, rinsed and dried
  • 4 brioche buns or soft potato rolls
  1. Using needle nosed pliers (I have some reserved for the kitchen in a drawer) remove the pinbones from the salmon. If you run the tip of your finger lengthwise down the fatter side of the salmon, you will find the bones poking upwards.
  2. Heat the grill or the grill pan, to medium.
  3. Spray the salmon on both sides with olive oil and sprinkle the ras el hanout evenly over the top of the fleshy side. It will tend to clump in spots but you can even it out with a stiff brush or even your fingers.
  4. Place the salmon flesh side down over medium heat on your grill and set the timer for 8 minutes.
  5. Meanwhile, heat about 1/4″ of canola or peanut oil in a heavy skillet over medium high heat.
  6. While the oil is heating, combine the rice flour and the cornstarch with a pinch of salt on a small plate. Lightly coat the sliced preserved lemon in the dry ingredients and set aside.
  7. Test the oil by dropping a little piece of bread into it. It should brown quickly and evenly. It it burns right away, it is too hot and you’ll have to begin again.
  8. Carefully, so you don’t splash yourself, lay the lemon slices in the hot oil. They should take a minute or two per side to become golden brown.
  9. Set aside on a plate lined with a paper towel.
  10. Whisk the harissa into the mayonnaise with a fork.
  11. The salmon should be ready to flip now.
  12. Flip the salmon over and set a timer for two minutes. Allowing the salmon to cook thoroughly on the flesh side should make flipping it over a breeze. It simply does not stick to the grate if you grill it this way and you get beautiful grill marks.
  13. Bring the salmon inside and cut it into 4 generous pieces.
  14. Spread both sides of the brioche or potato rolls with the harissa mayonnaise. Lay the salmon, then the arugula, then the preserved lemons  and top with the other half of the roll.
Ras El Hanout – makes about 1/4 cup
This recipe comes from Fine Cooking. It is so easy to throw together if you, like me, have loads of spices in your cupboard.
  • 2 Tbs. sweet paprika (preferably Hungarian)
  • 1 tsp. granulated sugar
  • 1 tsp. kosher salt
  • 1/2 tsp. freshly ground black pepper
  • 1/2 tsp. ground ginger
  • 1/2 tsp. ground cardamom
  • 1/2 tsp. ground cumin
  • 1/4 tsp. ground cloves
  • 1/4 tsp. ground cinnamon
  • 1/4 tsp. ground allspice
  • 1/4 tsp. cayenne
Combine all ingredients in a small bowl and stir with a fork.
Harissa – makes about 1/2 cup
This recipe comes from Sunday Suppers at Lucques.  I have only made wonderful food from this book.
  • 6 dried chile de arbol, ribs and seeds removed – this is much easier to do when they are dried
  • 2 San Marzano tomatoes, canned
  • 1/4 tsp whole cumin seeds
  • 1 medium cloves of garlic
  • freshly ground black pepper – several grindings
  • 1 tsp kosher sea salt
  • 1 tsp smoked paprika
  • 1/16 tsp cayenne pepper
  • 1/2 tsp sherry vinegar
  • 1/2 c. extra-virgin olive oil
  1. Heat a medium sized heavy sauté pan over high heat for 1 minute. Add the chilies to the pan and dry toast them until they have little black spots and they smell wonderful. Depending on the heat of your stove this could happen in seconds or take up to a couple of minutes – so don’t walk away! When they are done, set aside in a heat proof bowl and cover with very hot water. Set aside for 15 minutes.
  2. Setting the heat to medium, toast the cumin seeds. Seeing as the pan is already quite hot, this will take less than 30 seconds under your watchful eye. When they smell fabulous, take them off the stove and grind them in your mortar and pestle. If you don’t have one, crush them with the edge of the bottom of a wine bottle on a cutting board, or in a clean coffee grinder.
  3. In the same pan, cook the tomatoes over medium heat until darkened and somewhat thicker. Set aside.
  4. Drain the chiles and put them in a food processor or blender with the garlic, tomatoes, paprika, cumin, cayenne, vinegar, salt and pepper. Puree until combined. You will have to scrape down the container with a spatula frequently; this doesn’t make a lot of harissa. With the motor running, add the olive oil in a thin stream and blend until smooth.

To give you some idea how of delicious and universally pleasing the Moroccan Salmon Sandwich is, I will tell you that my picky five year old demolished his and ate half of a second and Martin and I ate ours and split a third. There was nothing left for Siri and Alistair and they had to be consoled with ice cream sundaes, which were clearly running a distant second to the sandwich. Alistair even ate just bread with the sauce and arugula because we’d run out of the salmon. Ok. I confess that the fried preserved lemon was a tough sell. My daughter managed to pick hers off even though I trickily shoved it underneath the tangle of arugula leaves. Siri is nobody’s fool and saw through my ruse immediately. The boys blithely polished the whole thing off, lemons and all.

Rarified poached egg on toast

If you were walking down Federal Avenue last Friday, and you happened to look up through the windows of my dining room, you would have seen a solitary woman at the table, eating lunch a tad more ceremoniously than one might usually when eating alone at home. That was me. It was a cold bright sunny day and I was taking this lunch seriously, some might say with intent, on a proper plate with a linen napkin. (Often my lunch is peanut butter and bitter marmalade on whole wheat toast, eaten standing up at the kitchen counter.) Mary Alice, who is beyond generous, brought over half a dozen, warm, very fresh eggs from Gumbo and Kebab, her chickens. Finally, I could recreate the poached eggs on toast with roast asparagus, satiny folds of prosciutto, and truffle butter I had last spring at the Girl and the Fig in Sonoma, on another sunny, much warmer, day in California.

In preparation for the eggs, I spent just a few minutes adding truffle oil and sea salt to softened french butter. Mashing it in, then tasting. Too much oil? Too much salt? When is it delicious enough? Oh, the sacrifices I make! Spending the morning making and tasting truffle butter indeed! If you remember lunch from the Girl and the Fig, you probably remember the truffle butter. You only need a tablespoon. It is easy to make and the oil is pretty easy to come by. Roast asparagus takes one minute of prep, four minutes in the oven. No problem there. The bread and even sometimes Prosciutto di Parma you can buy at the supermarket.

What aren’t so easy to come by, unless you have your own chickens, are fresh eggs. I hate to say it, but to enjoy this lunch, you have to have a very fresh egg. Even though the sandwich (somehow this really doesn’t feel like the right word!) is very simple, it is one of my top ten meals. I feel very lucky. Everyone should have a friend like Mary Alice.

Poached Egg on Toast with Prosciutto, Asparagus and Truffle Butter

  • 1 slice excellent bread with some whole wheat and a little rye if possible, a scant 1/2″ thick
  • 2 tbsp olive oil, divided
  • 1 tbsp butter
  • 1 very fresh egg
  • 1 slice prosciutto di Parma
  • 4 asparagus spears, rinsed, woody ends snapped off
  • 1 tbsp french butter, or cultured butter, at room temperature with a few drops of truffle oil and a small pinch of kosher sea salt mashed in, to taste
  • several pinches of kosher sea salt and freshly ground black pepper
  •  a skillet and a little metal pan you can put under the broiler.

Perfect poached eggs

  1. Set the broiler to high. Raise the oven shelf to the top rail.
  2. Heat up the skillet for a few minutes over medium high heat.
  3. Add 1 tbsp butter and 1 tbsp olive oil. When the butter stops foaming, add the bread. Let it sizzle but don’t let it burn. It should be deeply golden and crisp before you flip it over. Toast both sides. Place the toast on a nice plate.
  4. Lay a slice of prosciutto over the toast.
  5. Wipe out the skillet and fill it with water. Heat the water over high heat until it simmers. Add a tsp of salt. When the water is simmering crack the egg into the water. You may need to lower the heat to maintain a gentle simmer. If you have never poached a very fresh egg before, you’ll be amazed to see how the white holds together in a perfect oval! Now I know why the eggs I typically poach look so sloppy. Cook until the white is firm, about 5 minutes. Don’t let the yolk harden. That’s your sauce.
  6. Just as soon as you crack the egg into the water, toss the asparagus on the metal broiler pan with 1 tbsp of olive and a big pinch of kosher sea salt and a generous grinding of black pepper. Put the asparagus under the broiler for 2 minutes, then turn them over, they should be crisp and a little brown. Set them back under the broiler for 2 more minutes. When they are browned but before they become floppy and overdone, remove from the oven. Take them off the pan and put them right on top of the prosciutto. You don’t want them to continue to cook on the hot metal pan.
  7. Remove the egg from the boiling water with a slotted spoon if you have one, and carefully lay it on top of the asparagus. Dab the heaping tbsp of truffle butter on the side of the plate.
  8. Sit somewhere quiet and hopefully tidied up, with a large clean linen napkin and a glass of mineral water. Eat your lunch peacefully, without rushing.

After the asparagus and prosciutto and most of the toast and egg were gone, I found myself chasing tiny crisp crumbs around the plate with my knife, carefully scooping them up against the blade and then dipping the tip into the truffle butter. Some of the large grains of sea salt caught in the buttery crumbs adding mineral crunch and tang.  Then of course there were the traces of molten yolk that got scooped up too. I licked the end of knife. That was such an excellent lunch.

Snowed In – Red Lentil Soup

Sometimes this magical thing happens in my kitchen, where I have all of the ingredients, even some that are fairly obscure, and I can make something really delicious on the spur of the moment.  I love it when that happens.

Since Plenty, what I’ve been in the mood for is vegetables, and this blog I follow, Dana Treat, has tons of ideas for seasonal delicious vegetable food. (Notice that I didn’t say vegetarian? I really am not a vegetarian.) Still, maybe because of the holiday gluttony, vegetarian, even vegan food is what I crave. So I was very happy to discover this soup last week. It’s one I’ve eyed and abandoned in the Deborah Madison Vegetarian Cooking for Everyone for years. For some reason, I think because Ms. Madison described the soup as “thin”, it didn’t sound so delicious. Then I saw the photograph on Dana Treat, and I was turned. This is a fabulous soup. Also, it is very easy to make, which proved to be very handy when I was housebound with four kids for three days last week.

So often jilted by the weatherman predicting snow, I refused to believe what the weather reports were saying. Surprise, surprise! Wednesday morning we were totally snowed in, a rare thing in Seattle. I couldn’t get the car out of the driveway. I was afraid to even try. I was kind of desperate to come up with a dinner for four hungry kids using only what I had in the cupboard. Scanning the recipe for Red Lentil Soup with Lime; was it possible I had what I needed?! I peered into my pantry.

Wow. I had two cups of red lentils! I had basmati rice! Turmeric and cumin – I always have those! When I found some only barely wilted cilantro in the crisper and a couple of limes, there were clearly beautiful possibilities for dinner. (Although I feel I must mention that my brave and kind friend Mary Alice went out into the cold to bring us a gallon of milk, orange juice and—because I’m shameless—some fresh spinach for this soup! She trekked through the snow and ice with a backpack and Yaktrax (so cool!) on her boots for us!) Technically I suppose we could have skipped the spinach, but when you’re snowed in you get anxious for something green.

As always, and even though there is rice, I think this is lovely with homemade croutons. Only five extra minutes!

Red Lentil Soup 

from Vegetarian Cooking for Everyone, by Deborah Madison

  • 2 cups split red lentils
  • 1 tbsp turmeric
  • 4 tbsp butter
  • salt
  •  1 large onion, chopped fine (about 2 cups)
  • 2 tsp ground cumin
  • 1 1/2 tsp black mustard seeds
  • 1 bunch of chopped cilantro
  • juice of three limes
  • 1 bunch of spinach sliced crosswise in ribbons
  • 1 cup cooked basmati rice
  • full fat Greek yogurt for garnish
  1. Put the lentils, turmeric, 1 tbsp of butter, and 1 tbsp sea salt with 2 1/2 quarts of water in a 7 qt. heavy sauce pan or dutch oven. Over medium high heat, bring to a boil, then lower the heat and simmer for 20 minutes. The lentils should be very soft and nearly falling apart.
  2. Using an immersion blender, pureé until very smooth.
  3. While the soup simmers, in a large heavy sauté pan, cook the onion in 2 tablespoons of butter, with the cumin and the mustard seeds, over low heat. When the onions are very soft, after about 15 minutes, add the cilantro and cook for one more minute.
  4. Add the onion mixture to the soup and the juice of two limes. Taste to see if you would like more lime juice. This soup tastes very good a little sour.
  5. When it is time to serve the soup, take 1 tbsp of butter and melt in a wide skillet over medium heat. When it foams add the spinach and sprinkle with pinch of seasalt. Cook until it is just wilted and divide among the soup bowls. (I skipped the spinach for my son, he hates it. The soup was still very good)
  6. Add a generous spoonful of warm rice to each bowl. Ladle soup over the spinach and rice.
  7. Garnish with a dollop of yogurt.

Croutons

While the soup is simmering and the onions are sweating in butter, you could make the croutons. They are not required but I totally love them with this soup. I happened to have a very stale ciabatta on the counter during the snow week and I hacked off slices all week long. I put croutons under poached eggs, with cheese and salami and with this soup. It really doesn’t matter if the bread is very stale. The croutons should be glossy with butter and olive oil and so crisp they shatter as you bite down.

I would cook the croutons first, and then wilt the spinach, in the same pan.

  • 4-6 slices from a loaf of stale artisan bread, about 1/3″ thick
  • 1 tbsp butter
  • 1 tbsp olive oil
  1. Heat the butter and oil over medium high heat.
  2. Sauté sliced bread until golden, then flip. 1-2 minutes per side.

There is something about this soup, or maybe there are a few things. First of all, the color is ravishing, a pure saturated yellow, flecked with bright green cilantro. The scent of melting onions and the toasted aroma of mustard seeds were the perfect antidote to a cold wintery night. And then of course there was the cool, creamy, yogurt, in counterpoint to the richly flavored soup. We all loved it.

Snowed in

Date Night at Home

On Saturday night, we spent the evening in the kitchen setting beef drippings, butter, olive oil, crushed peppercorns, and brandy on fire. The flames were bright blue and flying right up over my head! Isn’t that kind of perfect for date night at home?

Staying in rather than going out might seem boring until you consider a few things. We didn’t need to make a reservation. Or search for parking. There was no need to find a babysitter. Or find something clean and reasonably stylish to wear. (This is sometimes a problem for me. Sigh.) There was no menu ennui. (Spare me yet another kale salad!) No meaningless chatter with a fawning waiter. At dinner, we could savor that last drop of wine since we were already home and didn’t have to drive anywhere. (It would have been criminal to cork even a tablespoon of that Williams and Selyem!) We could’ve eaten dinner in our pajamas! (We actually didn’t do this.) Best of all, we could cook whatever we wanted. And set it on fire!(As you might’ve guessed, for me, this is the fun part.)

I’m not a fan of steakhouses. Portions are ridiculously large, I loathe getting nickel and dimed on the sides, and they’re too rich anyway. I find the rituals of a steakhouse old fashioned and boring. To me, brandy, cigars and Frank Sinatra are for posers. However, there are times when I crave a perfectly seared and seasoned steak, charred almost to the point of being burnt yet still with a deeply rosy interior. I try to make lighter sides, still alluding to the steakhouse classics. The brandied pan sauce on the steak enriches the mashed potatoes. Sauteed mushrooms need nothing but a little shallot, butter and black pepper. The chard, edgy then sweet with garlic, chilies, and (fig) balsamic turns creamed spinach on its nose.

We always nibble on some very fancy cheese while we cook, something local or French. Something stinky. I know of a very good ginger-y cocktail (if you ask me I will send you the recipe!) that would be wonderful with cheese, but if you do get a really great bottle of wine, a cocktail is too much. If you drink mineral water while you cook, you won’t fall asleep right after dinner, which would be a shame on date night.

Somewhat traditional and very celebratory, this menu has played Valentine’s Day dinner often, sometimes birthday dinner.  Yes there is work involved, but it’s simple – no crazy mincing necessary. I barely batted my eyelashes at Martin and I got him to wash and trim the chard, a job I hate. It should have been me, as date night at home was my idea.

Date Night Dinner

  • Steak au Poivre with cream
  • Mashed Potatoes
  • Sauteed Mushrooms – black trumpet are delicious and need no trimming
  • Wilted Swiss Chard with Balsamic ( I was given a bottle of Fig Balsamic by a dear friend and I am deeply grateful!)

I couldn’t take a picture of the food because you can’t let a hot meal cool on its carefully warmed plates and start snapping pictures in the middle of dinner on date night.  I had to settle for a photograph of a table set in anticipation and the empty wine bottle.

First, read through the whole recipe, then assemble all these ingredients as written, plus 3 sauté pans and a 3 quart saucepan. One person should do the steak and mushrooms; the other, the potatoes and chard. There should be 15 minutes of prepping the ingredients and under 20 to do the cooking.

Pepper Steak

  • (2) six ounce beef tenderloins, let them come to room temperature for an hour before starting
  • 1 1/2 tbsp black peppercorns, roughly cracked in a mortar and pestle
  • 2 tbsp olive oil
  • 2 tbsp butter
  • 2/3 cup brandy
  • 1/2 cup heavy whipping cream
  • 3/4 tsp salt

Mashed Potatoes

  • 3 medium sized Yukon Gold potatoes, peeled, cut in half, and set into the 3 quart saucepan, completely covered in cold water
  • 1/2 cup milk + 4 tbsp butter in a Pyrex measuring cup or small saucepan
  • sea salt and freshly ground black pepper

Sauteed Mushrooms

  • 1/2 lb black trumpet mushrooms
  • 4 tbsp unsalted butter
  • 1 medium shallot, minced
  • salt and freshly ground black pepper

Wilted Chard

  • 1 bunch swiss chard, stalks removed, cut into 1″ strips
  • 2 tbsp olive oil
  • 1 garlic clove, crushed and minced
  • pinch of red pepper flakes
  • 1 tsp salt
  • balsamic vinegar to finish (if you happen to have any fig balsamic, now would be a good time to break it out)

The poshest bottle of Pinot Noir you can get your hands on – poured into glasses so it opens up in time for dinner.

  1. Set the table. Light the candles. The plates will be hot so you may need to protect the table with a thick mat or trivet.
  2. Start by setting the saucepan of potatoes on high heat to boil. When they reach a boil, set the heat to medium and allow them to simmer. They should be done about 20minutes after they reach a boil.
  3. Press the crushed peppercorns into the steak firmly, top and bottom, with the heel of your palm. Sprinkle each side with a pinch of sea salt. Set aside.
  4. Carefully examine the mushrooms, looking for debris. We found a rather large dark piece of wood in ours! Trumpet mushrooms are difficult to wipe clean, so we quickly rinsed them in a colander and dried them with towels.
  5. Heat the oven to 200. Put two dinner plates on the rack to warm.
  6. You’ll be cooking the mushrooms and the beef simultaneously.
  7. Set two heavy saute pans over medium high heat for 3 or 4 minutes. Use the larger one for the mushrooms – they need a lot of space or they won’t crisp properly.
  8. In the mushroom pan, melt the butter until it stops foaming.
  9. In the steak pan, melt the butter with the olive oil, until the butter has stopped foaming.
  10. Add the mushrooms to their sauté pan and stir to coat with butter. Stir every minute or 2. Initially, they will weep a lot of liquid.
  11. While the mushrooms are cooking, add the steak to the other sauté pan. Set a timer for 3 minutes. The steaks should really sizzle, if they aren’t your pan isn’t hot enough. It’s a fine line between seared and burnt, so you want to pay close attention. It’s deeply satisfying to get it just right. After 3 minutes, carefully flip the meat, and set the timer for 3 more minutes. You want to get a good sear in that amount of time, no longer, to keep the interior pink.
  12. While the steaks are searing, the mushroom will have lost a lot of liquid, let it bubble away until it is gone, then raise the heat a little and add the shallots. Now that the liquid is gone, the mushrooms can brown and become deeply flavorful. When they start looking crisp, taste one and add sea salt and black pepper. They may be done before the steaks. It doesn’t matter. Put the sauté pan on the back burner while the steaks catch up.
  13. Now that the steaks are seared, you need to cook each side for 3 more minutes on medium heat. This will produce a deep pink (not red!) interior. After a total of 12 minutes, remove the steak from the sauté pan and carefully, without dripping all over the edges of the plate, move them to the warming plates in the oven.
  14. While you are finishing the steak and mushrooms, your partner should work on the chard and mashed potatoes.
  15. In the microwave in a pyrex measuring cup or in a small saucepan on the stove, heat the butter and milk until the butter has melted.
  16. Check the potatoes with a fork; they should be just falling apart. Drain in the colander and return to the saucepan. Add the hot milk and butter and mash with a potato masher or a wire whisk until smooth. Season with sea salt and black pepper. Put the saucepan lid on a place on a back burner until dinner is done, which will be very soon.
  17. The chard and the pan sauce will be completed at the same time.
  18. In a clean sauté pan, heat the 2 tbsp olive oil over medium high heat. Add the garlic and chili flakes. Just as the garlic turns golden, add the chard and toss as it settles down, wilting. Toss for a few minutes. Turn off the heat and season with sea salt and black pepper.
  19. As your partner finishes the chard, heat the brandy in the steak sauté pan with all the browned bits, any fallen-off peppercorns and pan juices. When the brandy is bubbling, light a long match, stand away from the pan, and light it. If you have never done this before, the flames can leap rather high – almost 2 feet in my case. It’s kind of exciting. Anyway after several seconds the flames will die down some – you can just blow them out very easily. With a wooden spoon scrape up all the brown pieces on the bottom of the pan. When all is bubbling nicely, add the cream. Let it simmer over medium-high heat until thickened, about 3 minutes.
  20. Remove the plates from the oven with mitts – they’ll be hot. Mashed potatoes are first, cozied up near the steak. Ladle some of the pan sauce over them. Don’t make a lake of it! You don’t want a messy looking plate. Put the mushrooms alongside the steak and the chard by the potatoes. Splash just a little balsamic over the chard. Inhale. Exhale. Sit down to dinner.
Oh. My. God. There are 20 steps!
Don’t let that deter you! This is really fun – I promise!

(I wonder if I am the only person who thinks that setting things on fire in the kitchen constitutes a romantic evening?…Martin seems to like it!)

The (failed) Salad Redux

The holidays are over. It is raining listlessly. Through the window in my office I can see the looming black shape of the evergreen in the yard, the grey stick mass of the leafless maple tree and the leaden cocoon of the winter sky. In the living room, the Christmas tree is strung with a series of dusty, white, spider webs connecting the Santa Claus at the top to the light on the ceiling. Tree limbs droop with the weight of the ornaments and there are more and more needles on the carpet. (I’m taking the tree down tomorrow, I swear!) Outside, it is not particularly cold and certainly not warm, but it is soggy. Thick new moss grows on everything, greenly blanketing paths and the steps – even tree branches. What an excellent time of year to play around in the kitchen!

It was about this time last year that I wrote about grapefruit in salad. The winter weather must drive me to anything at all reminiscent of sunlight. Anyway, I made this salad over the holidays again and again and sent the recipe around to anyone who asked for it. (It’s a reworked and vastly improved version of the failed salad) I must have eaten it twenty times in the last month and I’m still not sick of it!

The candied walnuts were very last minute. There were none left at the grocery store (probably because I started a run on them!) so I had to find a recipe. I made the walnuts for the first time this Christmas Eve. Crisp, spicy and so one-more-handful-ish, I made a batch minutes before leaving for my aunt’s house: a sweet little extra Christmas gift. How perfectly handy –  to have a recipe like that.

The Salad

for 4-6 people

  • 2 bunches of watercress
  • a wedge of blue Castello or Cambozola, cold – to make cutting easier
  • a handful of candied walnuts (see recipe below)
  • 2 pink grapefruits or 3-4 blood oranges
  • 1 tbsp currants
  • 1 shallot – thinly sliced into rings
  • 2 tbsp Champagne vinegar
  • 1 tsp red wine vinegar
  • 6 tbsp olive oil
  • salt and pepper
  1. Combine 1 tbsp hot water and red vinegar in a very small bowl with 1 tbsp currants.
  2. In another very small bowl, toss champagne vinegar with the sliced shallot.
  3. Wash and dry the leaves of watercress and mound on a large platter.
  4. Cut the Blue Castello into small pieces, removing any rind, and strew over leaves.
  5. With a very sharp knife cut the top and bottom off the grapefruit. Cut off all the rind and pith. Over a medium sized bowl, carefully slice between the membranes to remove the fruit in sections, catching any juice and the fruit in the bowl.
  6. Arrange the sectioned grapefruit over the salad.
  7. Toss the walnuts over the top.
  8. Lift the shallots out of the vinegar carefully, reserving the vinegar for the dressing. Pulling the rings apart, scatter the shallots over the salad.
  9. Drain the currants, and toss over the salad.
  10. Add 1-2 tbsp grapefruit juice to the  small bowl with the champagne vinegar. Whisk in olive oil, 1/2 tsp sea salt, and a few grindings black pepper.  Dress the salad – you may not need all the dressing.
Candied Walnuts
(can be quadrupled!)
  • 1 cup large walnut pieces (mostly halves)
  • 2 tbsp maple syrup
  • 1 tbsp sugar
  • 1/2 tsp kosher sea salt
  • several grindings of pepper
  • an optional pinch of cayenne (I liked it; my kids, not so much)
  1. Preheat the oven to 325.
  2. Toss all ingredients together in a medium sized bowl.
  3. Lightly spray a rimmed cookie sheet with vegetable oil.
  4. Spread the coated nuts over the cookie sheet.
  5. Toast for 15 minutes, stirring every 5 minutes.
  6. Remove from oven and cool stirring every few minutes so they don’t stick too badly to the pan.
You might think you’re mad at me when you see how the maple syrup and sugar seem welded to the cookie sheet. Don’t worry. Pour a cup or two of very hot or boiling water over it and in a few minutes it will wash right off.

Heat: Linguine with clams

“It’s about the sauce, not the little snot of meat in the shell” Mario told me later. “Nobody is interested in the little snot of meat!” Heat, by Bill Buford

I can’t believe I’ve never written about this.

A couple of years ago I read this book Heat by a guy who was a fiction editor at the New Yorker.  He took time off from his life as an editor and took an unpaid position in the kitchen at Babbo, an Italian restaurant in New York. The book details what he learned and how it completely changed the trajectory of his life. Anybody who knows me well could tell you that I really loved this book. As in reading it six times in one year – the kind of love which probably would more accurately be described as obsession. There’s a particular passage where the author describes making linguine with clam sauce, “begin by roasting small pinches of garlic and chili flakes and medium pinches of the onion and pancetta in a hot pan with olive oil” and so on, and I could just about taste it while reading. I imagined the rich smoky scent of the pancetta. The briny, winey, butter swirling around silky noodles. Splayed grey clam shells and bright green parsley strewn over the top. Linguine with clam sauce might seem pedestrian – some version is served at every mediocre Italian restaurant – but Mr. Buford’s prose was so compelling, I had to try it.

For some crazy reason that had to do with having trouble finding the right page in the book when I wanted to shop for ingredients (I know this is a lame excuse but the book has no index!) and being fearful about major dinner revolt caused by serving clams to my kids who fear all shellfish except crab and shrimp, I never actually did try this recipe. Until today. Somehow after the excesses of Thanksgiving, linguine with clams seems festive and at the same time, a little bit reductive, at least in terms of technique and ingredients. It doesn’t take all day to put it together. It doesn’t require even a single glug of heavy whipping cream. And Mr. Buford’s description captured my imagination. I envisioned excellent baguette for mopping up the juices, a Verdicchio to drink and a lightly dressed fennel and cucumber salad. I thought this might be the perfect post Thanksgiving meal.

Babbo Linguine with clams, Mr. Buford points out, was “no longer linguine exactly; it had changed color and texture and become something else. I tasted it again…in this strand of linguine: an ocean pungency.” It was, deliciously, just that. And a welcome respite from leftover turkey and mashed potatoes as well.

Linguine with clams – serves 4

I had to conflate Mr. Buford’s method with some more practical aspects from Marcella Hazan’s recipe for Linguine with clams in Essentials of Classic Italian Cooking. For instance, “a big handful of clams”? What’s that? Ms. Hazan writes you’ll need 4 or 5 littleneck clams per person – sounds like a big handful to me.

  • 2 tsp finely chopped garlic
  • 1/4 tsp – 1/2 tsp chili flakes – this will barely be hot. If you’re not serving kids, bump it up a little.
  • 3 tbsp minced red onion
  • 3 tbsp finely chopped pancetta
  • 3 tbsp olive oil
  • 4 tbsp unsalted butter, softened
  • 4 splashes white wine (1/2-3/4 cup?)
  • 1 lb linguine fino
  • 24 littleneck or other small clams
  • 1/3 cup finely chopped flat leaf parsley
  • splash of green olive oil to finish
  1. Set a large pot of water to boil over high heat. Salt the water until it tastes as salty as sea water.
  2. Put a very large heavy bottomed sauté pan (not non-stick!) on a burner and set the heat to medium. Allow the pan to heat up for 2 minutes. Add the olive oil, then garlic, chili flakes, onion and pancetta, all at once. Stir until softened. Do not scorch. About 2 or 3 minutes.
  3. Spoon off any olive oil and add the butter. As it melts, swirl, and then add the wine. Let it bubble for 20 or 30 seconds and turn off the heat.
  4. When the water has hit a rolling boil, add the linguine. Stir until all the strands are separated and submerged and the water has returned to a full boil.
  5. Dump all the clams into the sauté pan, turn up the heat and clamp a lid on the top. The clams will be done in about 6 or 7 minutes. By this time the pasta will be nearly done.
  6. When the pasta is almost done, set the clams on high heat.
  7. Do not drain the pasta in a colander in the sink! The starchy pasta water clinging to the linguine is a key component of the sauce. Make sure the pasta pot is right next to the sauté pan. With big tongs, reach into the boiling water and drag the drippy wet pasta into the pan of clams – taking a few passes so you get most of the pasta out of the pot. Simmer the pasta and clams for 30 seconds.
  8. Dress lightly with the green olive oil and strew parsley over the top.
  9. Serve immediately in warm pasta bowls.

I bet you’ll love Heat, if you haven’t read it yet, although probably not as obsessively as I did. (Even I can see that was a little weird!) If you want to make this using Mr. Buford’s excellent notes, the text describing how starts on page 130 in the hardcover edition, two thirds of the way into chapter 12 for those of you who have the paperback.

White Fall Salad with a green variation: Fennel, Apple, White Cheddar and Hazelnut

White Fall Salad

I really hate to write about food that requires any sort of special equipment to be successful. I haven’t written up my favorite honey-saffron ice cream recipe or about the crazy pasta shapes I love or anything that might require a tool that falls into the realm of food geekiness. (That would include, for example, my ice cream maker and the pasta attachment on the KitchenAid.) A mandoline slicer falls into a category of esoteric kitchen equipment that most people don’t have much use for. Few people feel they need to julienne or shave things wafer-thin. So initially I was a little reluctant to write about this fennel salad.

But here is fall, misty and damp. Leaves are on the brink of yellow. The air is beginning to cool and local apples are appearing in the market, crisp and sweet-tart. Rubenesque end-of-summer heirloom tomatoes are a thing of the past. (I was getting a little sick of them anyway!) Now we’ll have a heap of paper thin fennel threaded with slivers of apple, shavings of sharp cheese and studded with toasted hazelnuts, all dressed tartly in cider vinaigrette. If you are serving the salad with something beige or brown like roast chicken, you may want to add a handful or two of arugula which looks gorgeous and is also intriguingly bitter against the floral fennel and the sweet apple. This is a salad for fall. If you don’t have a mandoline, you’d better sharpen your best chef’s knife, take a deep breath and get ready to slice.

White Fall Salad: Fennel, Apple, White Cheddar and Hazelnut

serves 4

  • 1 apple – I like pink lady but honeycrisp is also very good, in matchstick julienne
  • 1 fennel bulb, cored and sliced as thinly as you can manage
  • about 1/3 cup sharp white cheddar, shaved into very thin slices with a cheese slicer (or a vegetable peeler!)
  • a handful of hazelnuts, toasted for a few minutes in a skillet over medium heat (please don’t burn them)
  • optional: a handful or 2 of arugula leaves
Toss all ingredients together with your hands on a large white platter.
  • 6 tbsp olive oil
  • 3 tbsp cider vinegar (I like Bragg’s)
  • 1/2 tsp salt
  • a few grindings pepper
  • 1/2 tsp Dijon mustard
Whisk all ingredients together with a fork until emulsified. Drizzle over salad and gently toss.

White Salad with Arugula

If you are interested in owning a mandoline slicer, I have heard that this Japanese version is very good and a great buy. There is something very satisfying about slicing so precisely and efficiently, but that just might be a combination of the food geek and architect in me.

Heap of shaved fennel and mandoline

Rain in August = Pappa al Pomodoro

On my mobile telephone, I have this weather app so I can look up what the weather’s like in the cities that I’ve lived in. I love to see whether the weather is worse in Stockholm or Seattle, or if it’s raining in Paris or sultry and warm in Rome. For mid-August, it was awfully wet today here in Seattle. Not only wet, but grey and dark and cold. When I checked that weather app for Rome it showed five little shiny yellow circles for the next five days. It’s not really surprising.  88, 90, 92, 89, 88 – so not only sunny but nice and warm too.

As I stand at the kitchen counter chopping away, I think of sitting at table on the edge of the piazza, taking in the heat and the bustle of Rome, where the scent of exhaust and cigarettes mingles with the perfume of fresh tomatoes, sliced and drizzled with olive oil and sea salt on a wide white plate. Or a bowl of bread and tomato soup, served tepid, slicked with olive oil and strewn with basil leaves. (It’s strange – I usually hate the smell of dirty cars and cigarettes here, but in Rome, I loved it.) Those were some premium tomatoes and I’ve haven’t had anything close since we moved up here from California. I loved mopping up the juices with crusty bread and washing it down with a glass of wine as I watched the passeggiata. Now I find myself on a grey day stuck in my kitchen cooking for small children, with less than wonderful tomatoes and I have to wonder, how did this happen?! And it’s August! It’s not supposed to be rainy all the time is it? Of course we are getting tomatoes but they’re from California, Mexico and those Canadian ones they grow hydroponically. Knowing it’s 90 degrees in Rome is killing me. I could be sitting at the edge of the piazza eating something so simple and delicious. Thinking of all those ripe tomatoes in the outdoor market could easily make me cry.

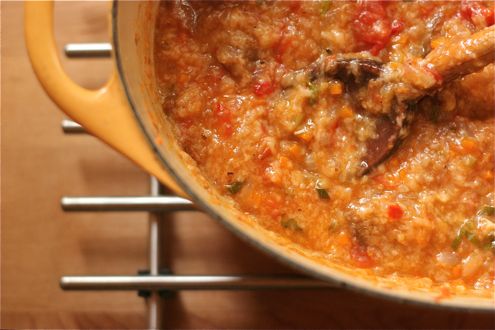
There’s hope though, for dinner anyway. What would you think about making tomato and bread soup? I had this soup several times a week, living in Italy. I’m sure if you’ve never heard of it, it sounds weird. If you’ve ever followed any of my soup recipes though, you know I’m a big fan of the garlic and olive oil slicked toast raft in a wide bowl of soup. This is a bit different. You cook stale bread into a chunky garlicky tomato broth for half an hour, and what you end up with is a satiny-rustic adult-baby food. All of which sounds like too much contradiction to be comprehensible. You’ll just have to trust me. Pappa al Pomodoro will transport you to the edge of a piazza in Rome no matter where you are or what the weather is like. Even if the tomatoes are pallid and mealy, this soup will still be fantastic.

A bowl of pappa al pomodoro, a glass of wine, a crisp salad and the sound of rain falling heavily outside the open back door changed everything. Tonight, the weather felt like an event to celebrate as we ate our wide bowls of silky, bread-thickened, tomato perfumed soup to the sound of raindrops. Even if the tomatoes did come all the way from Mexico.

The finished soup

Pappa al Pomodoro

This soup takes no time to throw together and it uses only water no stock. Don’t be tempted to substitute chicken stock for the water – this soup manages to be deeply flavorful and rich without any stock.

  • 1 red onion, diced fine
  • 1 slender carrot, diced fine
  • 1 stalk of celery diced fine
  • 1 pinch red chili flakes
  • 1/2 c. olive oil
  • 4 cloves of garlic, roughly chopped
  • 1 1/2 lbs  Roma tomatoes, skinned and roughly chopped – I use a serrated swivel peeler – this must be the fastest way to peel them. Don’t use fancy heirloom varieties – they won’t be flavorful enough here – you’ll lose everything that makes them special. what you want is a dense paste tomato – like a Roma.
  • 1/2 a bunch of basil, in chiffonade
  • 1/2 pound of quite stale Italian style bread, in 1/2 inch slices (you can dry it out in a 200 oven for 2o minutes. It should be quite hard.)
  • 1 cup hot water
  • more extra virgin olive oil for drizzling, grated parmesan for dusting

Chunky tomato broth

  1. Put the sliced stale bread in a large bowl and cover with cold water.
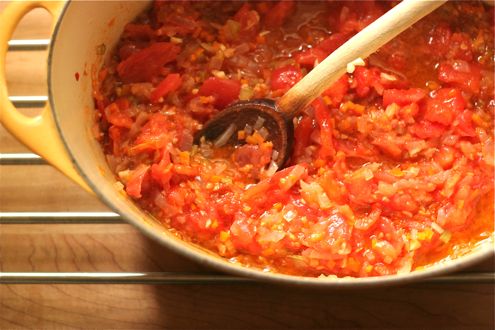
  2. Put the onion, carrots, celery, chili flakes and olive oil in a heavy 6 quart soup pot. Turn the heavy to medium and and stir until it sizzles gently. Turn down the heat and cover, cooking for 12 minutes, stirring a few times.
  3. Add the garlic and tomatoes, and stir, cooking for 5 more minutes.
  4. While the garlic and tomatoes cook down a little, drain the bread, discarding the water. Squeeze all the water out of the bread and crumble into the soup pot. Add the hot water and stir. Season with salt and pepper. Simmer over low heat for 25 minutes, stirring every few minutes
  5. Add the 2/3 of the basil and stir.
  6. Serve the soup garnished with the remaining basil in individual bowls.
  7. Pass the olive oil and parmesan at the table to season further.

Bread soaked in water

Mission Figs and Blue Castello

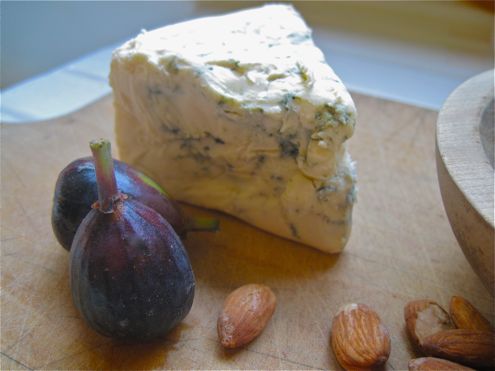
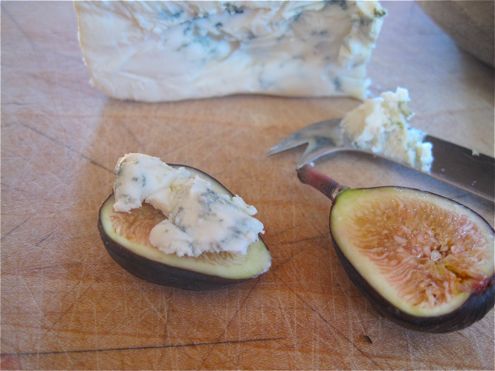
When we go on vacation, I’m always sure I’ll post at least something short at Notes on Dinner, but it never really works out that way. I took pictures on the trip though and now I have something very easy for August: figs and blue cheese for an appetizer, although it might also be dessert. Oozing creamy cheese shot with threads of sharp blue underscores the sweetness of black figs, sticky with juice. An old wooden board, a knife, a little glass of crisp mineral-y wine. It might seem off the cuff, even haphazard, but it’s not. This is laid back yet composed; some might even say elegant. (That might be me!)

I won’t call this a recipe and it seems silly to write it all out but here’s how it works:

  1. Buy a basket of Black Mission figs and a wedge of Blue Castello or a similarly rich mild blue.
  2. Rinse figs.
  3. Unwrap cheese.
  4. Get knife.
  5. Serve on a cutting board. I like to let people cut the figs and cheese themselves.

That’s it. The only little nicety you might add, if you get to the market in the morning, is to pull the cheese from the icebox an hour before you eat. You could also put a few almonds or walnuts out – they’d be even prettier served in the shell with a nut cracker.  We had a glass of chilly rosé with our figs, blue and almonds and that was just right.